The TCEC19 Computer Chess Superfinal: A perspective
1.The TCEC19 Premier Division
Season 19’s Premier Division was a gathering of the usual suspects but one participant was not quite what it seemed! Stockfish – mighty in Season 18 – had become Stockfish NNUE and there was great anticipation of what the added self-learning component to Stockfish’s evaluation would mean for Stockfish’s strength. In my own engine matches (on much weaker hardware and faster time controls) played from many types of positions, Stockfish NNUE had looked extremely impressive against ‘old-fashioned’ Stockfish Classical. Most surprising to me was that Stockfish NNUE defended even better than Stockfish Classical, which is not a particular strength of self-learning systems. I just wondered whether at long time controls making Stockfish ‘think like an NN’ would blunt the destructive power that makes it so formidable. I also had high hopes for AllieStein which had performed so impressively in the end-of-season-18 bonus competitions.
As it turned out, DivP also had a familiar outcome as Stockfish – after a slow start – and a resurgent Leela forged ahead and dominated the race for the SuperFinal spots. Leela kept pace for quite a while but a loss to Stockfish and a late Stockfish surge created a clear gap between first and second.
AllieStein finished a disappointing third, playing solidly but without sparkle. Stoofvlees did what only it can do, mixing fine games with mini-disasters! The relegation battle was intense with four engines – Komodo, ScorpioNN, Fire and Ethereal – in constant danger. Komodo saved itself with a resounding win against Stockfish (the latter’s only defeat in DivP) while ScorpioNN’s two wins against Stoofvlees hauled it out of the relegation places and pushed Fire into them! Ethereal was somewhat unfortunate in the sense that it was pummelled by both Stockfish and Leela while performing reasonably against the other engines.
Looking ahead towards the SuperFinal, it seemed that both Stockfish and Leela had improved significantly and that Leela would not be outclassed in the SuperFinal. However, it seemed likely that – given similar openings to Season 18 – Stockfish would be too strong in too many types of positions. The game that really convinced me of that was Stockfish’s fantastic win against AllieStein, showing excellent positional play in a Leningrad Dutch followed by a mind-boggling tactical sequence!
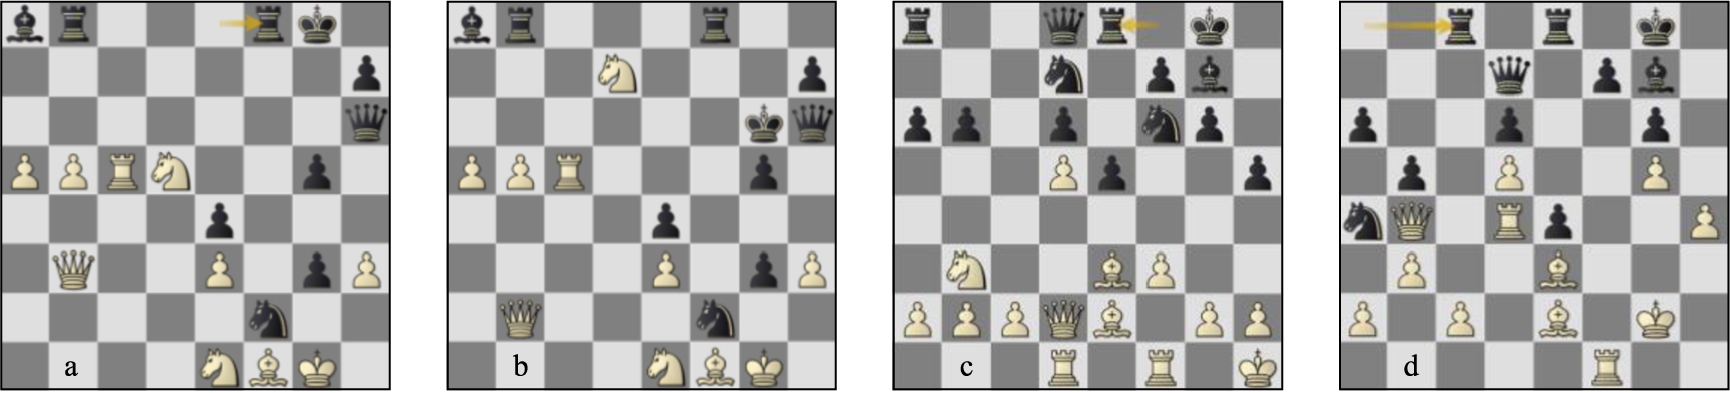
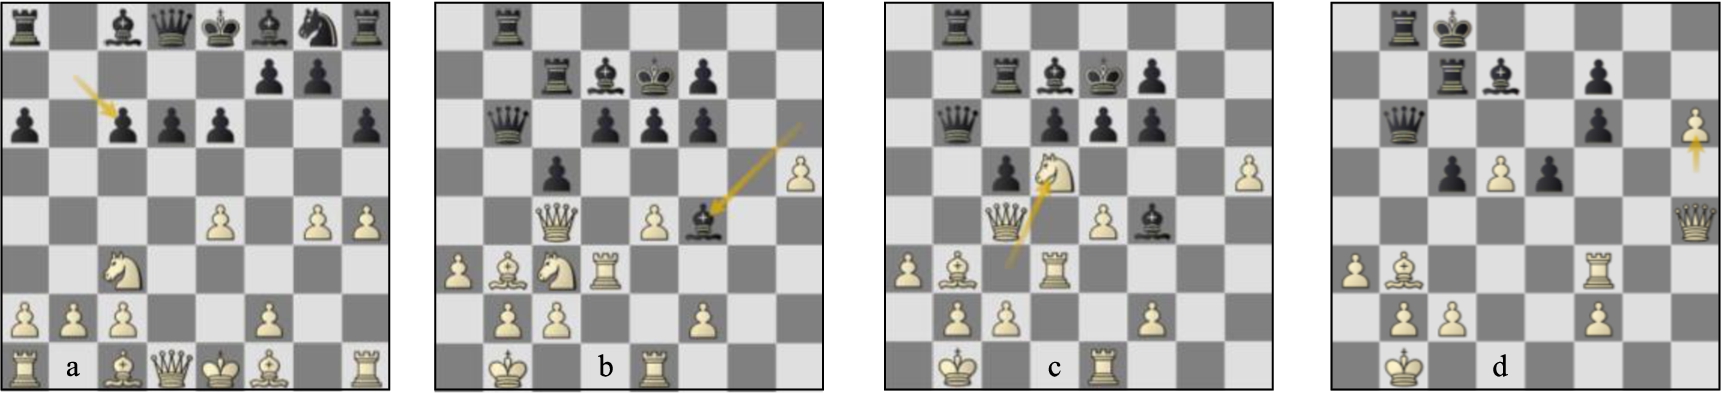
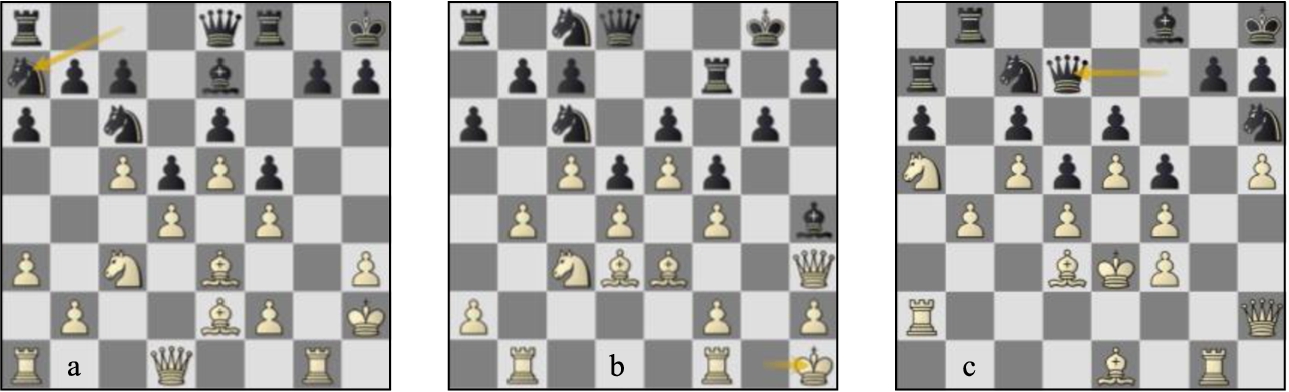
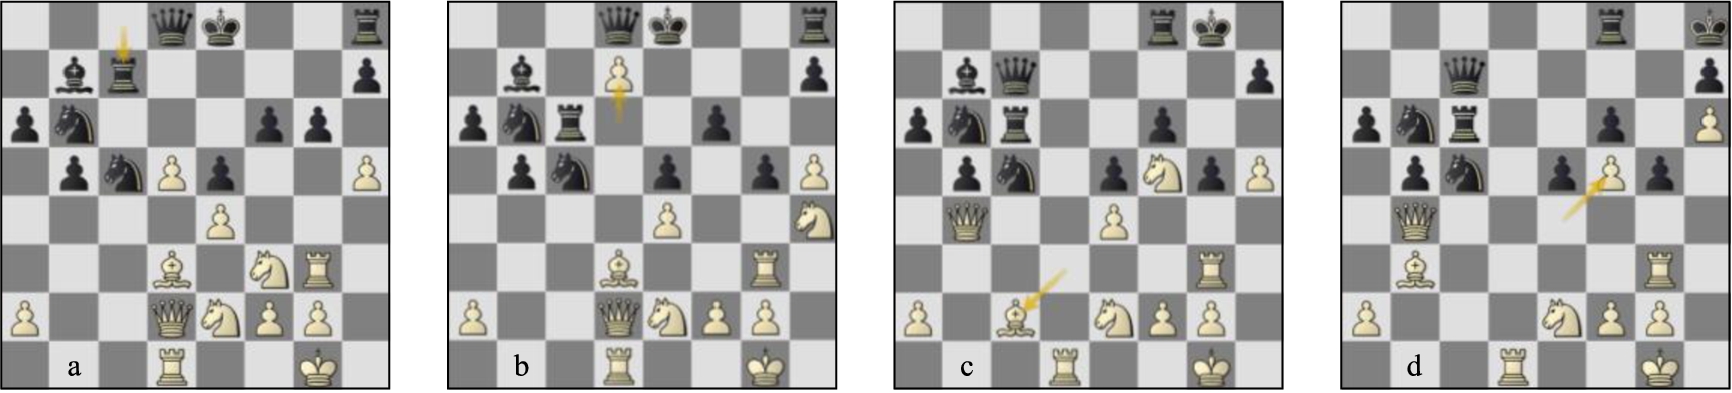
Figure 1a. Wild tactics had exploded as Allie sought compensation for its collapsing queenside by launching a sacrificial attack against White’s king. Stockfish had responded with an exchange sacrifice of its own to break through Black’s centre. White has a discovered check, but nothing looks decisive. That is what I thought and that is what the kibitzing engines thought but Stockfish saw much deeper! 35.Nb6+. An amazing move – White moves the knight to the queenside and yet it becomes an integral part of a kingside attack! 35...Kg7. 35...Rf7 36.Rf5 Rbf8 37.Bc4 a crucial resource in many lines. 37...Nxh3+ 38.Kf1 wins!.
36.Qb2+ Qf6. 36...Kg8 37.Bc4+; 36...Kg6 37.Nd7, see Fig. 1b. That is how the knight on b6 joins in the kingside attack! Via, b6–d7, the knight is coming to e5 putting the black king in great difficulties.37...Nxh3+ 38.Bxh3 Qxh3 39.Nxf8+ Rxf8 40.Rxg5+ is the only move but a winning one! 40...Kxg5 41.Qg7+ Kh4 42.Qxh7+ Kg4 43.Qg6+ Kh4 44.Ng2+ and Black loses its queen.
37.Qxf6+ Rxf6 38.Nd7. The knight has the final say: after winning back the exchange, White has two unstoppable connected passed pawns. 38...Rd8 39.Nxf6 Kxf6 40.Nc2 Rd2 41.a6 h5 42.Rc8 Bd5 43.Nb4 Bc4 44.Rc6+ Kf7 45.Bxc4+ Ke7 46.Bf1 g4 47.hxg4 h4 48.Rh6 1–0
Fig. 1.
Premier Division game 38/10.2 St-AS (a) pos. 35w, (b) var. p37b: Superfinal g01 Lc-St (c) p16w, (d) p25w.
2.The TCEC19 Superfinal
The SuperFinal ended in a convincing victory for Stockfish by eighteen wins to nine, 54.5–45.5. The match started as a nail-biter as the scores were level as late as game 51 but as the openings became more unbalanced, Leela was unable to match Stockfish’s conversion rate from superior positions. Once again congratulations to TCEC Book maestro Jeroen Noomen for a varied book that gave both engines a chance to shine, and to the TCEC sponsor, admins, UI developers, mods and dedicated chatters who together make this such an enjoyable event to watch!
Game 1. The match started with a Sicilian Najdorf, Leela choosing the aggressive 6.Be3 line. On move 8, Stockfish chose the typical neural net move ...h5 to hold back the g4 kingside pawn thrust (a line I played many times in the late 1990s with good results) and a lively game ensued!
1.e4 c5 2.Nf3 d6 3.d4 cxd4 4.Nxd4 Nf6 5.Nc3 a6 6.Be3 e5 7.Nb3 Be6 8.f3 h5 9.Qd2 Nbd7 10.Nd5 Bxd5 11.exd5 g6 12.Be2 Bg7 13.0–0 b6 14.Kh1 0–0 15.Rad1 Re8, Fig. 1c. Both sides have developed quietly. 14.Kh1 was new in my over-the board database but this position had been heavily played in correspondence chess.
16.g4. This idea caught me by surprise: over-the-board players have tended to prepare g4 with h3 to recapture on g4 with the h-pawn, opening the h-file and keeping control over the e4–square. Leela’s choice is more ambitious and probably a reaction to 15...Re8. After 16.g4 hxg4 17.fxg4 Ne4 18.Qb4, Black cannot follow up thematically by getting its kingside pawns moving with ...f5 as its rook on e8 no longer supports the f-pawn. It is not too clear therefore what Black can achieve with its knight on e4.
16...hxg4 17.fxg4 Ne4 18.Qb4 Ndc5. A novelty in my database (18...Nec5 has been played previously) but after the exchange of knights on c5 we are back, transposed into known territory.
19.Nxc5 Nxc5 20.g5 e4 21.h4. This is the real novelty of the game. It is a logical move, consolidating White’s extended position by protecting the g5–pawn. A few more moves (Kg2, Rf2, Rdf1) and White will be in control of the position. However, 21.Kg2 gives Black an unexpected chance for counterplay that explains why correspondence players preferred the mysterious 21.b3 in this position.
21...Qd7, gaining a tempo by threatening ...Qh3+. 22.Kg2 Na4. The knight hits White’s queenside structure. After the natural 23.c3, White’s queen is somewhat cut off from the kingside and the new weakness of d3 gives Black the idea of ...Nc5 followed by ...Nd3. If White captures the knight, then its kingside light squares will be weak. 23.b3 is too late of course due to 23...Nc3. Leela found an excellent riposte.
23.Rd4. White blocks the a1–h8 diagonal, ready to offer a rook for Black’s strong dark-squared bishop. This seems forcing as White is threatening to capture the knight on a4. Stockfish however, refuses to concede ground. 23...b5 24.b3. White appears to have neutralised Black’s play against the queenside: with the knight’s access to c3 blocked by 23.Rd4, Black seems to have no choice but to retreat the knight. However, both engines had seen that Black does not need to back down!
24...Rac8, Fig. 1d. 25.bxa4 Rxc2 26.Rf2 Rxe2 27.Rxe2 Qg4+, a surprising perpetual check. Black has only a queen in play and White seems to have plenty of pieces around its king!
28.Kf2 Qxh4+ 29.Kg2 Qg4+ 30.Kf2 Qh4+ 31.Kg2 Qg4+ 32.Kf1 Qh3+ 33.Ke1 Qh1+ 34.Kd2 Rc8 35.Re1 Qg2+ ½(1/2)–½(1/2)
The reverse was much less interesting. In the first game of the Premier Division against ScorpioNN, Stockfish had been forced to play a Najdorf line with Nf3 (1.e4 c5 2.Nf3 d6 3.d4 cxd4 4.Nxd4 Nf6 5.Nc3 a6 6.Be3 e5 7.Nf3 Be6 8.Bc4 Be6) and achieved little. Here, Stockfish elected to play the non-critical 6.a4 e5 7.Nf3 and got nowhere.
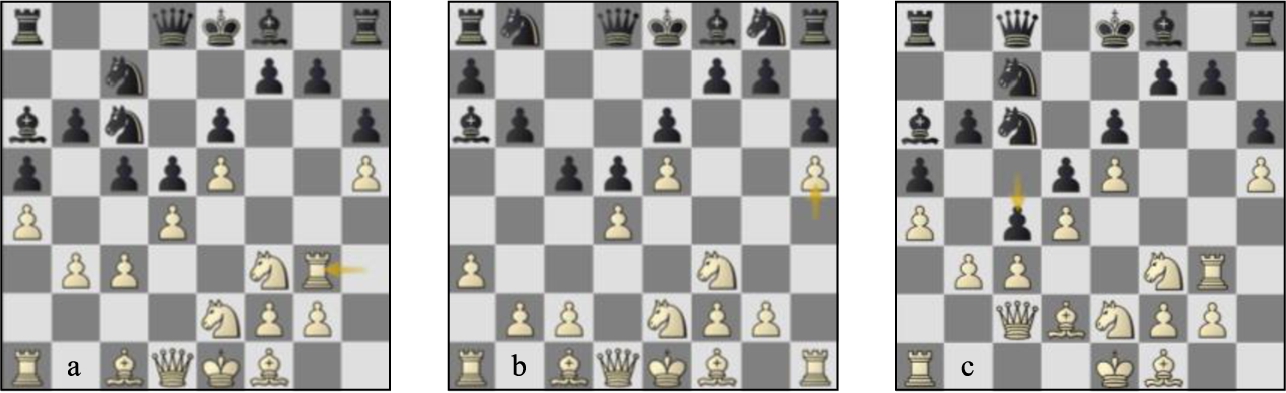
Games 5–6. Neither Stockfish nor Leela budged an inch on the Black side of a Bayonet King’s Indian in games 3 and 4, but games 5 and 6 saw first blood with two convincing wins on the White side of an offbeat French (1.e4 e6 2.d4 d5 3.Nc3 Nf6 4.e5 Ng8). It transposes into a French Winawer line that Petrosian and Bronstein used to play (1.e4 e6 2. d4 d5 3.Nc3 Bb4 4.e5 b6 5.a3 Bf8) and it is a line that every French player has considered as a way of sidestepping theory. It is perfect against an attacking player, less good against a strategical player and both Leela and Stockfish demonstrated perfect strategy:
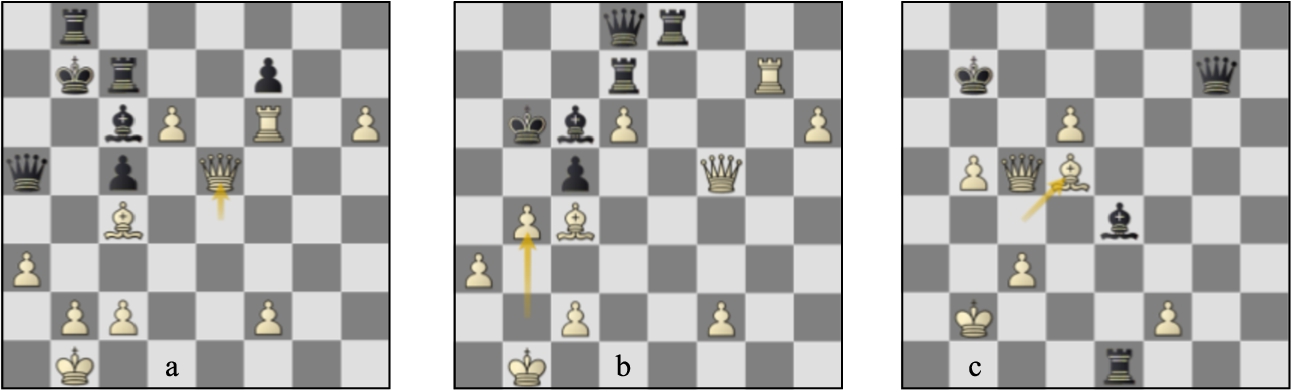
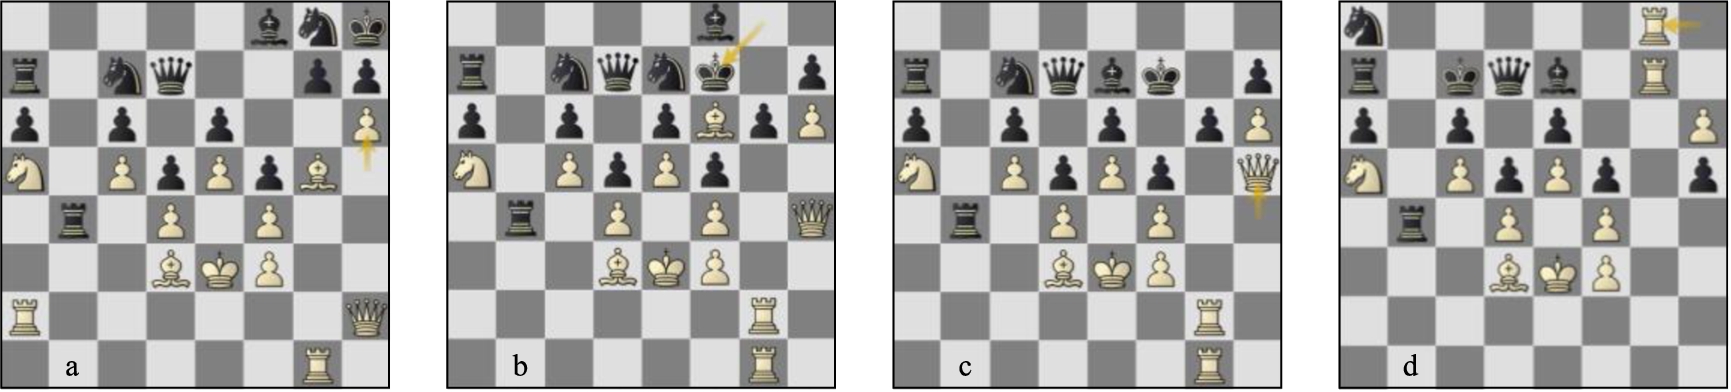
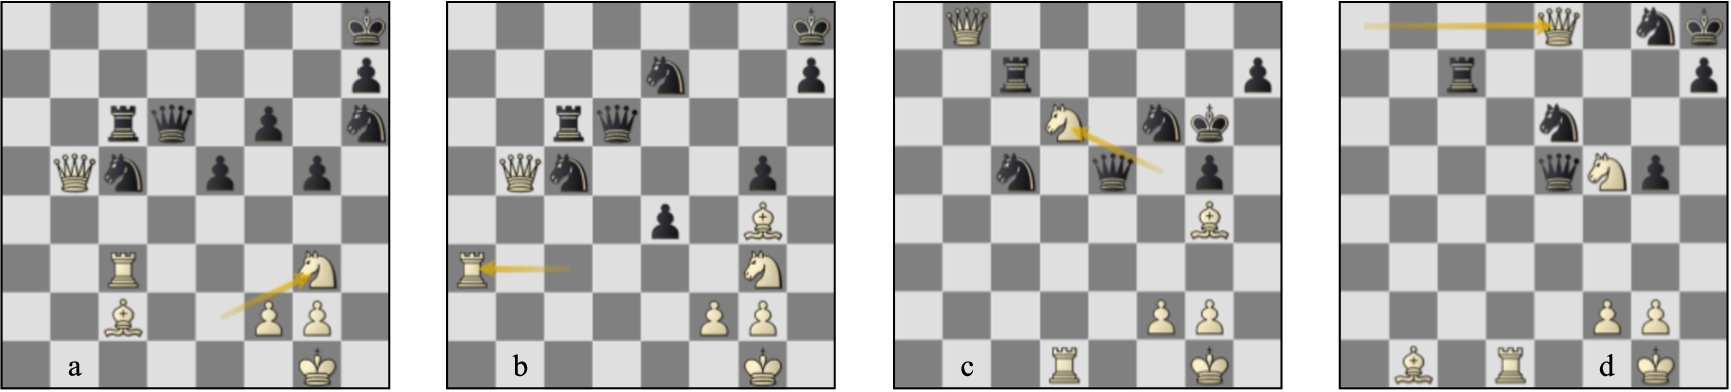
1. Squeeze Black on the kingside (using the typical neural net rook’s pawn march!) and make it unattractive/impossible to castle there, see Figs. 2a and 2b.
2. Push Black into a decision on the queenside. If Black closes the queenside, then White will have a free hand on the kingside; if Black allows the queenside to be opened, then there will be no safe place for its king, see Figs. 2c and 3a.
Fig. 2.
Games 05-06: (a) g05 p14b, (b) g06 p9b, (c) g05 p17w.
It was turning into a real match! The next noteworthy moment was in a King’s Gambit in game 9 where White was forced to sacrifice a piece Muzio-style on the f-file. Not a Leela speciality and the (friendly!) trolling in the chat reached a peak as Stockfish claimed −1.55 and Leela just −0.11! Was Leela walking blindly into a losing line?
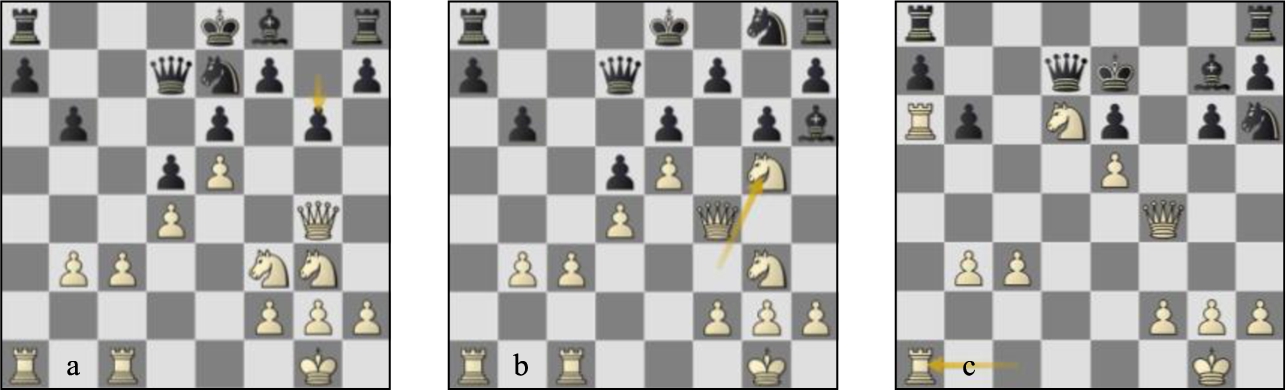
Fig. 3.
Games 05-06: (a) g06 p12b, (b) g05, p34b, (c) g06, p19b.
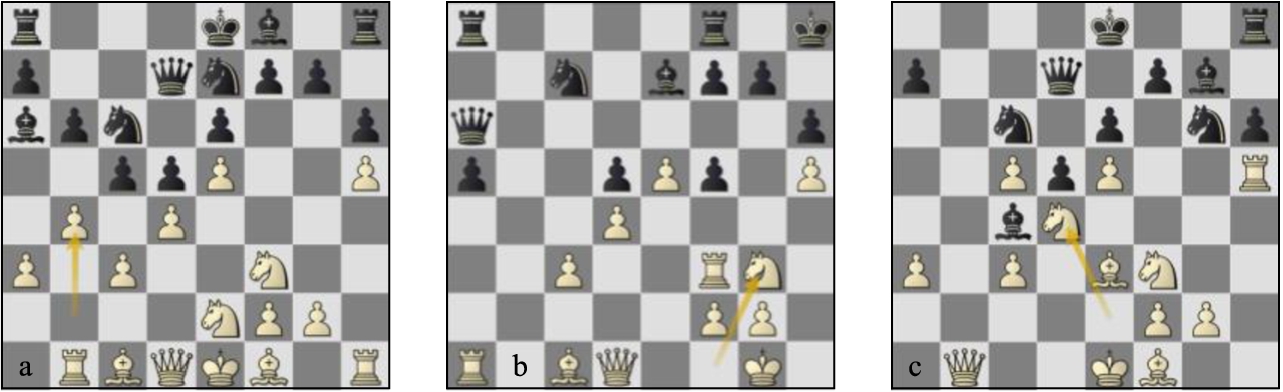
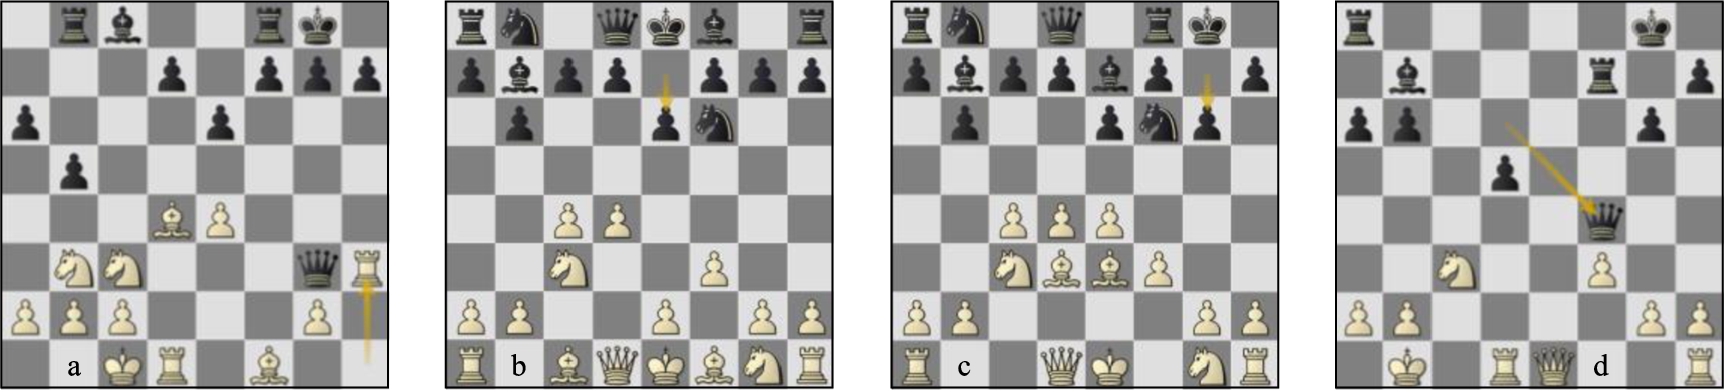
1.e4 e5 2.f4 exf4 3.Nf3 g5 4.Nc3 d6 5.d4 g4 6.Bxf4 gxf3 7.Qxf3 Nc6 8.Bb5 Bd7, Fig. 4a. Here Leela went for a long forcing line that it evaluated as approximately equal. In the reverse game, Stockfish played 9.Qf2 Bg7 10.e5 and had to suffer for a long time in a queen vs three pieces position.
9.Bxc6 bxc6 10.0–0 Bg7 11.Be5 f6 12.Qh5+ Kf8 13.Bxf6, Fig. 4b. Leela continues in Romantic style throwing another piece onto the already flaming fire, but Stockfish was in no mood for roses and candlelight! Its evaluation rose to –1.5 and there was already talk of a double kill in this mini-match! 13...Nxf6 14.e5 Qe8 15.Qh4 Qg6 16.Rae1, Fig. 4c. 16...Bf5. After this last-minute decision from Stockfish, its evaluation aligned with Leela’s to approximate equality. 16...h5 17.Ne4 Bf5 18.exf6 Bh6 19.f7 Kg7 had been Stockfish’s main line but it had seemingly misevaluated 20.Ng3, see Fig. 4d.
Fig. 4.
Game 09 Lc-St (a) p9w, (b) p13b, (c) p16b, (d) var. p20b.
20...Bg5 (20...Bg4 21.Ne4 threatens Rf6 and forces a repetition with 21...Bf5 22.Ng3) 21.Nxf5+ Qxf5 22.Qg3 Qg4 (22...Qg6 23.h4 Bd2 24.Re7 Raf8 (24...Qxg3 25.f8Q+) 25.Qf2 Bh6 26.c3 and Black is completely tied up. At the very least, White is going to grab a lot of queenside pawns while Black tries unsuccessfully to unravel!) 23.Qc3. White’s threat is either d5+ or simply h3 to drive the black queen away from the defence of Black’s kingside and 23...Bf6 24.Rxf6 Kxf6 25.h3 Qg5 26.h4 Qxh4 27.d5+ Kxf7 28.Rf1+ Kg8 29.Rf3 Rh7 30.Rg3+ Kf7 31.Rf3+ was calculated with precision to a draw by repetition.
17.exf6 Bxf6 18.Qf4 Kg7 19.Qxf5 Bxd4+ 20.Kh1 Qxf5 21.Rxf5 and Black was a touch better but Leela had no problem in holding, drawing in 46 moves.
This result certainly gave Leela fans courage for future unbalanced openings. It had managed to out-calculate Stockfish and better evaluated White’s compensation for two sacrificed pieces.
Both Leela and Stockfish demolished a very dodgy Dutch in games 11 and 12 (1.d4 f5 2.Bg5 g6 3.Nc3 Bg7 4.Nf3 h6?? Aaargh! No!!), Leela by sacrificing material and Stockfish by taking it! Stockfish was under heavy pressure on the Black side of a Robatsch in game 13 but held a difficult endgame consummately. I was horrified by what Leela was doing positionally as Black in game 14 – and judging from the evaluation, so was Stockfish! – but Leela found a precise way to exchange pieces and mitigate the general ugliness of its position.
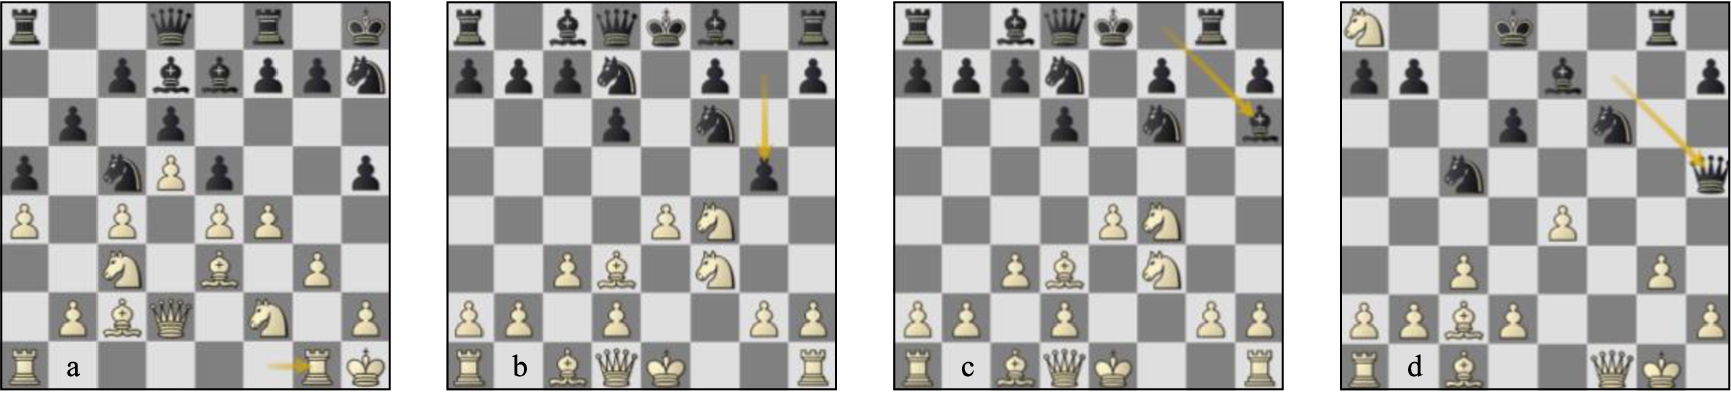
Stockfish took the lead for the first time in game 18 with a superb attacking display in the Sicilian Taimanov. The game was taken from a Karpov-Kasparov World Championship match and both Leela and Stockfish demonstrated special engine insight in these Sicilian structures by capturing on c6, which no human player had done. 1.e4 c5 2.Nf3 e6 3.d4 cxd4 4.Nxd4 Nc6 5.Nc3 d6 6.g4 h6 7.h4 a6 8.Nxc6 bxc6, Fig. 5a.
I had also seen Leela play for this structure against Fire in DivP in Season 18 with great success, but as a child I had been taught that this was a serious positional mistake (English GM Danny Gormally made the same remark in a Twitter conversation) as the strengthened Black centre and the open b-file should give Black plenty of counterplay. However, the loosening of the Black queenside and the advanced White kingside pawns make finding a safe spot for the black king problematic. Leaving it in the centre is fine to start with but if Black wishes to make use of its central pawn majority with ...d5, then the king should be somewhere else or White will sacrifice to open the centre! Black also has difficulties developing its kingside as ...Nf6 will get hit by g5. In its Black game, Leela keeps the king in the centre, avoids ...d5 and essentially plays to survive the opening!
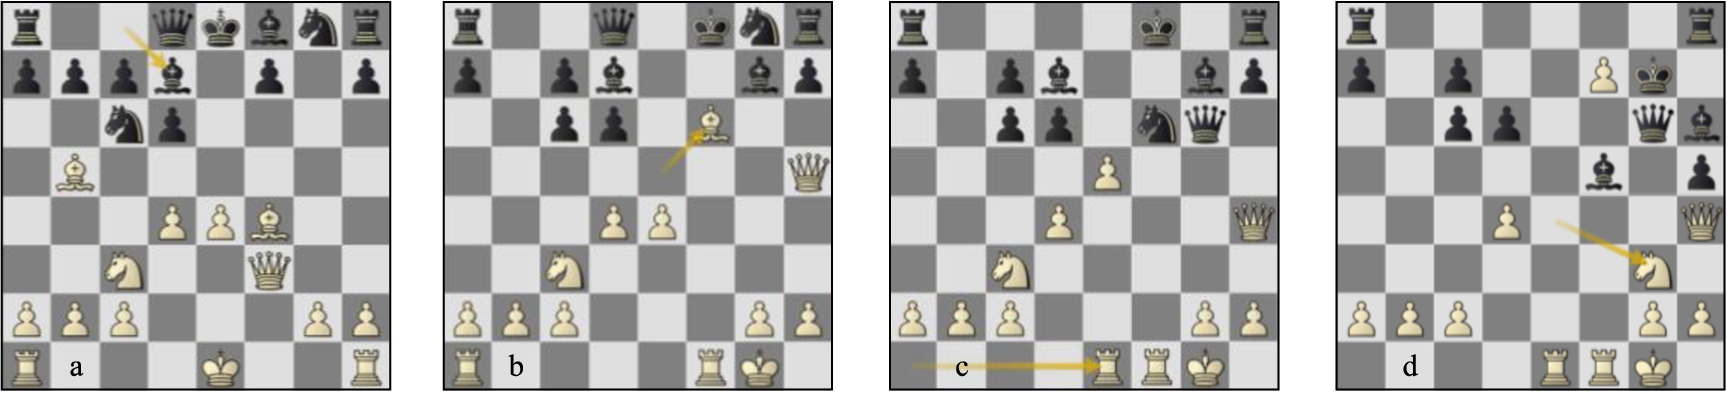
Fig. 5.
Game 18 St-Lc (a) p9w, (b) p26w, (c) p26b, (d) p31b.
9.Qd3 Nf6 10.g5 hxg5 11.Bxg5 Qb6 12.0–0–0 a5 13.Qf3 Bd7 14.Bc4 Rb8 15.Bb3 c5 16.h5 a4 17.Nxa4 Qa5 18.Bxf6 gxf6 19.Nc3 Qb6 20.Qd3 Ke7 21.a3 Bh6+ 22.Kb1 Rhc8 23.Qc4 Rc6 24.Rhe1 Rc7 25.Rd3 Bf4, Fig. 5b.
We rejoin the game on move 26. Leela had defended well for a while, but had just played a couple of strange time-wasting rook moves (23...Rc6 followed by 24...Rc7) whose point was difficult to ascertain. When it tried to recover the situation by transferring its dark-squared bishop to e5 with 25...Bf4, Stockfish was ready to pounce! 26.Nd5+, Fig. 5c. The move that instantly jumps into your mind when you see the position! However, the exact sequence to get the attack up and running is not obvious and the judgement of the resulting positions is extremely difficult! 26...exd5 27.exd5+ Be5 28.Qh4. The only move order, threatening Rxe5+ followed by d6 as well as f4. Black has no time for its counterplay with ...c4 and must run with the king. 28...Kd8 29.Rxe5 dxe5 30.Rf3 Kc8 31.h6, Fig. 5d.
This is the difficult part of the combination. Black has a queen and two rooks pointing at the white king and the lever ...c4 to help assault the b2–square. How can White have time to calmly queen its h-pawn? 31...Kb7. 31...c4 32.h7 cxb3 33.h8Q+ Kb7 34.Qxb8+ Kxb8 35.Rxb3 wins easily for White. 32.Bc4, another beautifully calm move, blocking Black’s counterplay with ...c5–c4 while threatening Rb3 pinning the queen to the king.
32...Ba4 preventing Rb3. 32...Ka7 33.Rb3 Qd6 34.Rxb8 Kxb8 35.h7 demonstrates another unusual aspect to this combination: the attacker (Stockfish) is not against exchanging its attacking pieces as its h-pawn ensures the rapid arrival of reinforcements! 33.Rxf6, knocking the queen off the b-file thus slowing down Black’s counterplay against White’s king.
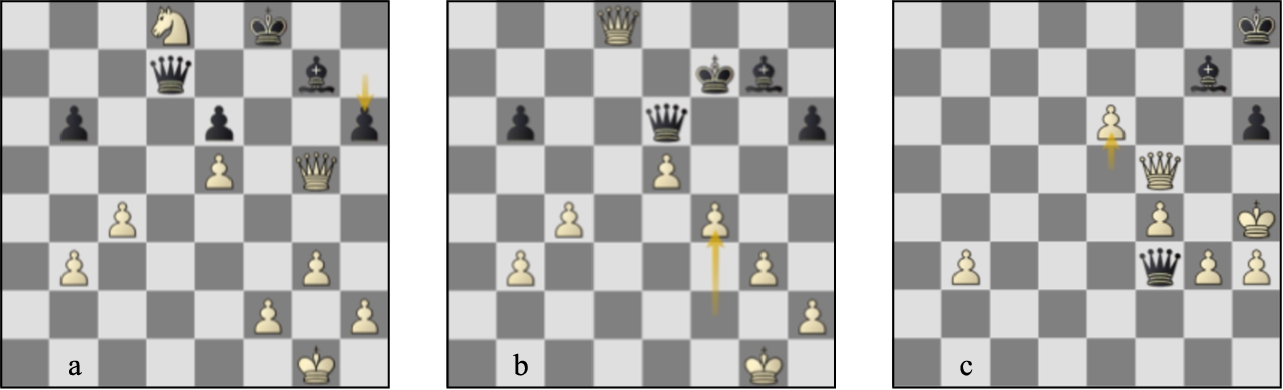
33...Qa5 34.Qe4 Bb5 35.d6+ Bc6 36.Qxe5, Fig. 6a. I was shocked during the game at how difficult it is for Black’s major pieces to get at the white king while Stockfish calmly adds to its impressive tally of extra pawns! 36...Re8 37.Qf5 Rd7 38.Rxf7 Qd8 39.Rg7 Kb6 40.b4, Fig. 6b.
Another wonderful move! Now it’s White attacking on the queenside as well! 40...cxb4 41.axb4 Rxg7 42.Qc5+ Kb7 43.hxg7 Re1+ 44.Kb2 Qf6+ 45.c3 Qxg7. The h-pawn is stopped on the brink of the try line, but White’s remaining trumps are more than enough: the exposed black king and the passed d-pawn. 46.b5 Be4 47.Bd5+, Fig. 6c. Again, Stockfish exchanges its attacking pieces to prosecute its attack! Really unusual! 47...Bxd5 48.Qxd5+ Ka7 and Black resigned as 48...Ka7 49.d7 wins!
Fig. 6.
Game 18 St-Lc (a) p36b, (b) p40b, (c) p47b.
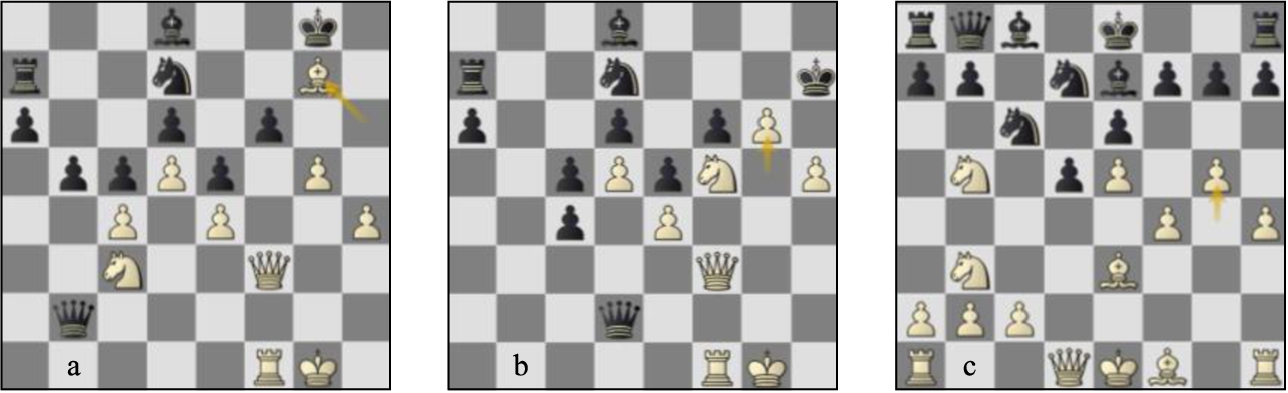
Leela had to wait until game 23 to draw level, winning a Queen’s Indian after Stockfish sacrificed the exchange but failed to find enough for it. Since Leela held the reverse without incident, the scores were level again! A run of tight draws ensued in a variety of openings – Scandinavian, Blumenfeld Counter-Gambit, Pirc and Benoni – where both engines seemed able to keep a slight opening disadvantage as Black within manageable proportions whatever the structure! A cheeky book exit in game 33, which forced a position with three pieces against a queen, see Fig. 7a, merely led to a win for both sides! With a new sequence of thirteen consecutive draws, it seemed as if these engines would remain matched until the very end but unexpectedly the match turned.
It started with this strange opening in game 47: 1.d4 Nf6 2.c4 b6 3.Nc3 Bb7 4.f3 e6, see Fig. 7b. Right from the opening, Black is in danger of landing in a prospectless position with its bishop on b7 biting into the granite wall of White’s f3 and e4 pawns. Although Stockfish did not solve its opening problems, in principle it handled this situation better than Leela, finding a path into a non-standard position.
5.e4 Be7 6.Bd3 0–0 7.Be3 g6, Fig. 7c. This odd move received a few horrified remarks from me on Twitter, but it makes sense when you see Stockfish’s follow-up. Black wants to strike in the centre with ...d5 and ...c5 and wants the knight to move safely to h5 after e5.
Fig. 7.
(a) Game 33 Lc-St p18b: game 47 Lc-St (b) p5w, (c) p8w, (d) p24w.
8.Qd2 d5 9.cxd5 exd5 10.e5 Nh5 11.0–0–0 c5 12.Kb1 cxd4 13.Bxd4 Nc6 14.Nge2 Bg5 15.Qe1 Nxd4 16.Nxd4 Bf4 17.Bb5 Qc7 18.e6 Ng7 19.Bd7 a6 20.exf7+ Rxf7 21.Be6 Nxe6 22.Nxe6 Qd6 23.Nxf4 Qxf4, Fig. 7d. With an isolated pawn to play against and a good knight against a bad bishop, I expected Leela to make life unpleasant for Stockfish but Leela soon exchanged the knight for Black’s bishop to win the d5–pawn after which Stockfish had no trouble finding enough play to draw.
In game 48, Leela by contrast took on a passive structure and waited, see Fig. 8a. The win certainly was not easy for Stockfish but this type of structure was not a good choice against it. I would also have expected Leela to convert a win as White!
After a couple of draws, we entered a bloodbath phase with six decisive results in the next ten games of which Stockfish won four and Leela two, stretching Stockfish’s lead to +3. Having shown the viability of Nxc6 in Open Sicilians, Leela and Stockfish set out to prove in games 51 and 52 that the Keres Attack (1.e4 c5 2.Nf3 d6 3.d4 cxd4 4.Nxd4 Nf6 5.Nc3 e6 6.g4) against the Scheveningen is a forced win for White if Black does not stop g5 with
1.e4 e5 2.f4 Qf6 3.Nc3 exf4 4.Nf3 d6 5.Nd5 Qd8 6.Nxf4 Nf6 7.c3 Nbd7 8.Bd3 g5, see Fig. 8b, an amazing idea. Considering Black has wasted two moves with ...Qf6–f8, I am not sure why it should work... but it does! 9.Nxg5 Rg8 10.Nxf7.
Stockfish Classical goes all in as quiet play is fine for Black. 10.Nf3 Bh6, see Fig. 8c, is the amazing idea, embarrassing White by hitting the only defender of g2! 11.g3 Bxf4 12.gxf4 Qe7 13.Qe2 Nc5 and Black will regain its sacrificed pawn!
Fig. 8.
(a) Game 48 St-Lc p18b: Sufi Bonus 2 game g55 StClassical-St (b) p9w, (c) p11w, (d) p19w.
10...Qe7 11.0–0 Qxf7 12.Bc2 Nc5 13.Nd5 Be7 14.Nxc7+ Kd8 15.Nxa8 Bg4 16.Qe1 Bh3 17.g3 Bxf1 18.Qxf1 Qh5, see Fig. 8d, with a balanced game drawn by a repetition of moves on move 29.
Finally, in game 60 Stockfish outlasted Leela in a mammoth 164-move game in the Alekhine’s Defence. I would be lying if I said that every move was a pleasure to watch but when the end came, you realised it had been worth waiting for!
1.e4 Nf6 2.e5 Nd5 3.d4 d6 4.Nf3 Bg4 5.Be2 e6 6.0–0 Be7 7.h3 Bh5 8.c4 Nb6 9.Be3 0–0 10.Nc3 d5 11.c5 Bxf3 12.gxf3 Nc8 13.Bd3 Nc6 14.f4 f5 15.Kh2 Qe8 16.Be2 a6 17.Rg1 Kh8 18.a3 N8a7, see Fig. 9a. The contours of the game were fixed early on: White has more space and an open g-file to play with, but White’s attacking channels are very narrow. In general, White can play risklessly for the win. While kibitzing the game, GM Peter Heine Nielsen, second of World Champion Magnus Carlsen and a keen TCEC follower, reminded us of this ancient game which he had managed to win! Fig. 9b gives a position, also 18 moves in.
Fig. 9.
(a) Game 60 St-Lc p19w: (b) Nielsen-Savko (EU-ch U18 Vejen 1993) p18b: (c) game 60 St-Lc p143w.
We fast-forward to move 143, Fig. 9c, with both engines playing on increments. Stockfish’s evaluation indicated a clear White advantage with 1.14 but this evaluation had flatlined for many moves. White has made progress on the queenside with targets on a6 and c6 while the knight on a5 ties down the black queen and restricts the rook on a7. However, there is still no clear breakthrough. Stockfish now offered Leela a pawn... Had Leela been human, it would surely have suspected something and refused! Leela suspected nothing however and grabbed it!
143.Bh4 Rxb4 144.Bg5 Ng8 145.h6, Fig. 10a. It certainly is not obvious how White intends to break through but the consequence of 143...Rxb4 is that the back rank is bereft of cover by Black’s rooks and this turns out to be the decisive factor. 145...g6 146.Qh4 Ne7 147.Bf6+ Kg8 148.Rag2 Kf7, Fig. 10b. It feels fraught for Black as White has made inroads into the black kingside and mobilised the bulk of its firepower towards it. The breakthrough is extraordinary however!
149.Bxe7 Bxe7 150.Qh5, Fig. 10c. Wow!! The one piece you would imagine could not be missed in an attack is the one Stockfish sacrifices! If Black’s rook was still on b8, then ...Rg8 would be an adequate counter. However, Leela wanted the b4–pawn and it will cost the game! 150...gxh5 151.Rg7+ Ke8 152.Rxh7. The situation is similar in some ways to game 18. There, White sacrificed a rook but an unstoppable rook’s pawn gave White a great deal of leeway in exchanging attacking pieces. Here too, Black’s pieces are too poorly placed to stop the rook’s pawn and also unable to launch a counterattack against the white king. The result is that White wins almost in slow-motion by shepherding its rook’s pawn home.
Fig. 10.
Game 60 St-Lc (a) p145b, (b) p149w, (c) p150b, (d) p155b.
152...Kd8 153.Rgg7 Na8 154.Rh8+ Kc7 155.Rhg8, Fig. 10d. Incredible! How does White have so much time to do this? 155...Ra4 156.h7 Rxa5 157.h8Q Nb6 158.Re8 Nc8 159.Rxc8+ Qxc8 160.Rxe7+ Kb8 161.Qxc8+ Kxc8 162.Rxa7 Kd8 163.Rxa6 Rxa6 164.Bxa6 h4 1–0.
The match calmed down again although not without some surprises. For example, the Czech Benoni was thoroughly pummelled in Season 18, but here both engines held draws as Black. Stockfish seemed to cut it a little fine in game 61, see Figs. 11a/b, but Kramnik-style claimed it was 0.00 all along!
Fig. 11.
Game 61 Lc-St (a) p29b, (b) p34b: (c) game 67 Lc-St p15b.
Another inferior Sicilian was destroyed by both engines in games 67 and 68 by the simple expedient of throwing the kingside pawns forwards as in Fig. 11c!
And then we moved back to all-in fighting with Stockfish winning four games to Leela’s one. Strangely without Leela seeming outclassed, the gap between the two engines was growing to substantial proportions. The level of play was outstanding in this period, in particular games 77 and 78. The opening choice for these games was particularly nice: a pawn sacrifice in the English, first tried by German Grandmaster Robert Huebner in 1980.
1.c4 c5 2.Nc3 Nf6 3.Nf3 d5 4.cxd5 Nxd5 5.e4 Nb4 6.Bc4 Nd3+ 7.Ke2 Nf4+ 8.Kf1 Ne6 9.b4 cxb4 10.Ne2 Nc7 11.d4 e6 12.h4 b5, see Fig. 12a.
13.Bd3. Black has some difficulties. For the sacrificed pawn, White has an invulnerable centre and a lead in development while Black’s king is again a thorny dilemma. The number of White pieces within striking distance of Black’s kingside makes castling there a risky proposition while the queenside is rather flaky after the forced TCEC book move 12...b5! The kingside is lacking its normal cover as the king’s knight via f6–d5–b4–d3–f4–e6 has ended up on the appalling c7–square from where it blocks both the queen and the open c-file and is currently employed in defending the loose b5–pawn. In its Black game, Stockfish ran early for the kingside with its king and was completely demolished!
13...Bb7 14.Rh3 Nd7 15.Kg1 Bd6 16.Ng3 0–0 17.e5, see Fig. 12b. Thanks to still having the rook on the h-file, White is teeing up for the typical Bxh7+ sac. Black counters this by exchanging its light-squared bishop for White’s king’s knight, but by doing so loses its grip on its central and kingside light squares. 17...Bxf3 18.Qxf3 Be7 19.Ne2 a5 20.g4, see Fig. 12c, a really strong plan that caught me completely by surprise. Qe4 is coming next, forcing a concession on the kingside for White to target.
Fig. 12.
Game 77 Lc-St (a) p13w, (b) p17b, (c) p20b, (d) p27b.
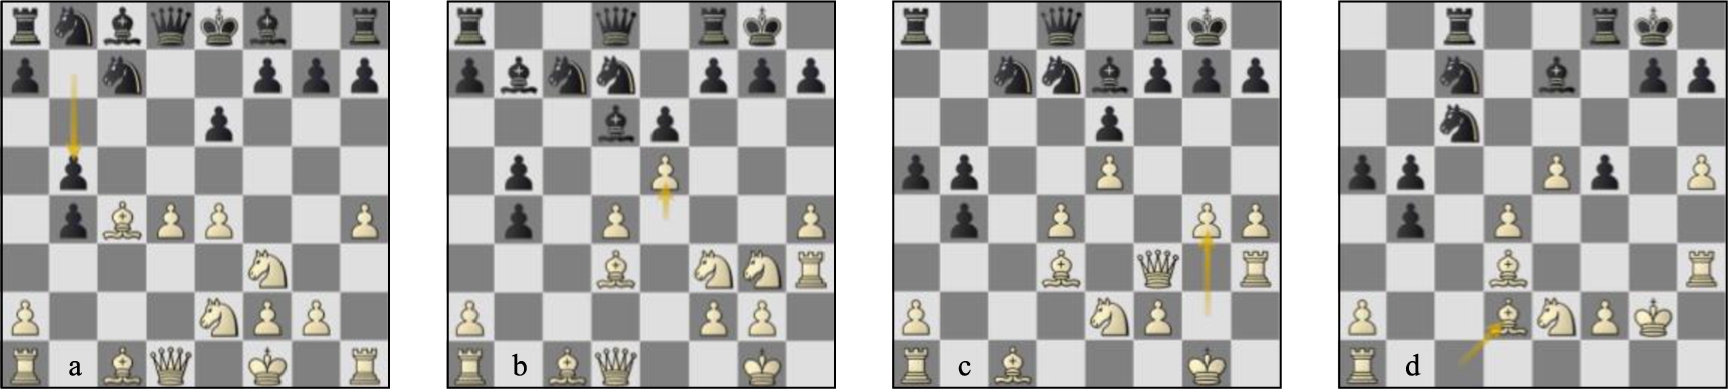
20...Rc8 21.Qe4 f5 22.Qc6 Nb8 23.Qg2 Qd5 24.gxf5 Qxg2+ 25.Kxg2 exf5 26.h5 Nc6 27.Bd2, Fig. 12d. This doesn’t look so bad at first sight but Stockfish was already sunk in complete depression at 2.94 for White. With so little foothold on its own light squares, Black’s knights are unable to establish themselves anywhere....Nd5 allows Bxb5, …Rcd8 allows Rc1 and ...Rfd8 allows Bxf5. Stockfish sacrifices a piece in desperation but the result is never in doubt.
27...Ne6 28.d5 Nxe5 29.dxe6 Rfd8 30.Rc1 Rxc1 31.Nxc1 Rd4 32.Be3 Rd5 33.Bxf5 Nc4 34.Be4 Re5 35.Kf3 Kf8 36.Bxh7 Nxe3 37.fxe3 Rxe6 38.Nd3 Bf6 39.e4 Bc3 40.Nf4 Rc6 41.Nd5 Bb2 42.Kf4 Rc5 43.Bg6 a4 44.Rf3 Bf6 45.Nxb4 Ke7 46.Nd5+ Kf8 47.h6 Kg8 48.h7+ Kh8 49.Rd3 Rc8 50.e5 Bd8 1-0.
In the reverse, game 78, Leela defended fantastically, leaving its king in the centre, keeping its position out of the range of White’s pieces and redeploying the poorly-placed knight on c7 to the much better b6-square. Leela seemed to be managing the exceptionally delicate balancing act of redeploying while delaying making concessions to the very last moment but suddenly, Stockfish started its attack!
1.c4 c5 2.Nc3 Nf6 3.Nf3 d5 4.cxd5 Nxd5 5.e4 Nb4 6.Bc4 Nd3+ 7.Ke2 Nf4+ 8.Kf1 Ne6 9.b4 cxb4 10.Ne2 Nc7 11.d4 e6 12.h4 b5 13.Bd3 Bb7 14.Rh3 a6 15.Rg3 Nd7 16.Qe1 Rc8 17.Bd2 g6 18.Rd1 Na8 19.d5 e5 20.Bxb4 Bxb4 21.Qxb4 Nab6 22.Qd2 f6 23.h5 Nc5 24.Kg1 Rc7, Fig. 13a.
Leela has just played 24...Rc7, covering the threat against the g6–pawn with its own counterplay along the h-file! 25.hxg6 fxg6 26.Rxg6 Rch7 gives Black plenty of play! Leela has not yet castled kingside so the option of transferring its king to the queenside which is now defended by three well-placed minor pieces (via ....Kd7–c8, or ...Qd6, …Kd8–c8) is a definite possibility. 24...Rc7 also allows Black to activate its light-squared bishop – Black’s worst piece until now – with ...Bc8, covering some kingside light squares. Stockfish chooses this last moment before Black consolidates to strike with some absolutely stellar play!
25.d6. This sharp thrust was a possibility Black had to be aware of from the moment White played 19.d5, but I didn’t understand how Stockfish was planning to follow it up. d6 is risky in the positional sense as Black’s light-squared bishop increases in scope while the d6–pawn is not easy to protect.
25...Rc6. 25...Qxd6 26.Bxb5+. 26.Nh4 g5. More or less forced. 25.d6 has distracted Black’s rook away from c7 so Black can no longer generate play along the h-file after the capture on g6. 26...Rxd6 27.Bxb5+ Ke7 28.Nf5+ gxf5 29.Rg7+ Kf8 (29...Ke6 30.Qxd6+ Qxd6 31.exf5+) 30.Qh6 Rxd1+ 31.Kh2 is the first tactical line White needs to calculate to justify its play.
27.d7+, Fig. 13b. A fantastic idea! The obvious 27.Nf5 is met by 27...Bc8 followed by ...Bxf5. The exchange of this fantastic knight and the destruction of the f5–outpost while doing so stabilises Black’s position considerably. 27.d7 forces the black queen to d7 blocking the bishop’s access to the c8–h3 diagonal thus enabling White to establish the knight on f5 for the foreseeable future. That is a lovely positional gain – the knight attacks squares close to the black king and takes away the d6 square from the black rook – but it is only a start. There is still a huge amount of work to do to turn this into something concrete: 27.Nf5 Bc8 28.Qb4 Bxf5 29.exf5 Nd5 30.Qb1 Rxd6 31.Bxb5+ Ke7 32.Bc4 Qb6.
Fig. 13.
Game 78 St-Lc (a) p25w, (b) p27b, (c) p30b, (d) p33b.
27...Qxd7 28.Nf5 0–0 29.Qb4 Qc7 30.Bc2, Fig. 13c. Another cool regrouping. The bishop is moved off the open d-file and redeployed to b3 where it pins the black king into the corner – a state of affairs that White will reinforce with the neural net march of the rook’s pawn to h6! Note also that Nh4–f5 and Bc2 have reconnected the rook on g3 with the rest of White’s forces so the rook is now able to join in play along the open c- and d-files.
30...Kh8 31.Bb3 Bc8 32.h6 Bxf5 33.exf5, Fig. 13d. Black has finally managed to castle its king and destroy the f5 outpost but the position of the black king is a huge worry: any white major piece reaching the back rank will deliver mate, as the black king is completely restricted. By contrast, White’s king is completely safe which means Black has no easy way to strike back at the White position. Leela regroups its knight from b6 (again! – this knight has already jogged from g8–f6–d5–b4–d3–f4–e6–c7–a8–b6!) to attack the pawns on f5 and h6 and try to remove the thorns that are preventing its king from moving.
33...Rd8 34.Rxd8+ Qxd8 35.Rc3 Qd6 36.a3 Nc8. Rerouting the knight to e7 to attack f5. 36...Nxb3 is obviously what Black wants to remove the piece taking away g8 from its king. 37.Rxc6 shows the point of protecting the white queen with 36.a3! 37...Qxc6 38.Qf8# and the weakness of Black’s back rank tells again. 37.a4, opening more invasion lines for White’s major pieces.
37...Ne7 38.axb5 axb5 39.Qxb5 Nxf5 40.Bc2 Nxh6 41.Ng3, Fig. 14a. I’m not sure about you but my first impression was that Black had come pretty well out of this! The pawns on f5 and h6 have been removed and the white bishop has been chased from b3 so Black’s king is free to move again! Black also has two extra pawns. Of course, there are some problems with Black’s position: the kingside light squares are extremely weak – what Black would give to play ...g5–g6! – and there is an awkward pin along the c-file but surely we can deal with that in some way. Well actually... not! Both the factors I have described – the pin on the c-file and the weak Black kingside light squares – work together to give Black awful problems. The only way to stop Ne4 winning material is to give up a pawn with 41...f5.
41...f5. 41...Rc7 42.Qb8+ Kg7 (42...Ng8 43.Bb3) 43.Qe8 threatening Nh5+ mate wins. 42.Bxf5 Ng8. By giving up the f5–pawn, Black gains a tempo to protect its rook on c6 with ...Ne7. By distracting the white bishop from the defence of d1 with 41...f5, Black can now meet 43.Ne4 with 43...Qd1+! 43.Bh3. 43.Ne4 Qd1+ 44.Qf1 Qxf1+ 45.Kxf1 Ne7 holds everything for Black.
43...Ne7 44.Bg4 e4 45.Ra3, see Fig. 14b. The position still does not look too bad for Black – worse definitely due to the awkwardness of Black’s pieces and its open king but surely not lost? Well the results of the many engine games I played from this and subsequent positions were overwhelmingly in White’s favour. Black has to keep White’s major pieces out of its back rank to protect its king; Black’s only way of doing so is to move its knight to a6 (blocking the a-file and covering b8) but this stretches Black’s defences (forcing Black to protect the knight with rook and queen) while depriving the kingside of a defender. Secondly, Black has no way to create pressure against White’s king and no way to safely force the exchange of queen or rook. In essence, Black must wait in an uncomfortable holding position while White optimises its pieces to force a breakthrough. It takes a great deal of accuracy from White to keep Black tied down while improving its position, but Stockfish is definitely the engine to do it!
Fig. 14.
Game 78 St-Lc (a) p41b, (b) p45b, (c) p57b, (d) p63b.
45...Na6 46.Qb2+ Qf6 47.Qe2 Qd6 48.Ra1 Ng8 49.Qxe4 Nf6 50.Qa4 Qe5 51.Rd1 Rc7 52.Qb3. 52.Qxa6 Nxg4 53.Rd8+ Kg7 54.Nh5+ Kf7 55.Qa2+ Kg6 and White’s checks have run out. 52...Kg7. Pieces are hanging everywhere but nobody is taking them! 52...Nxg4 53.Rd8+ Kg7 54.Rg8+ Kf6 55.Qf3+ Qf4 56.Rf8+ Ke7 57.Rxf4 Rc1+ 58.Nf1 Rxf1+ 59.Kxf1 Nh2+ 60.Ke2 Nxf3 61.Rxf3 wins for White.
53.Nf5+ Kg6 54.Ne3. An extremely unpleasant manoeuvre. White is threatening Qd3+ picking up the knight on a6 as well as the regrouping Bf5–b1 when Nf5+ will be even more dangerous for Black. Black decides it has to allow White entry to its 8th rank to get the knight on a6 to safety.
54...Nc5 55.Qb8 Kg7 56.Nf5+ Kg6 57.Nd6, see Fig. 14c, interrupts the communication between the black rook and queen and prepares the manoeuvre Bf5+...Bb1. 57...Re7 58.Bf5+ Kg7 59.Bb1 Ng8 60.Nf5+ Kh8. Black sets up its desperate last ditch defence along the 8th rank! But there’s nowhere to escape after that! 61.Qf8 Ne6 62.Qa8 Rc7 63.Qe8, a very strong move, forcing an exchange into a winning endgame, see Fig. 14d. 63...g4 64.Ba2 Qxf5 65.Bxe6 Qg6 66.Qxg6 hxg6 67.Rd8 g3 68.fxg3 1–0. 68.fxg3 Rg7 69.Kf2 Kh7 70.Rxg8 Rxg8 71.Bxg8+ Kxg8 72.Kf3 is a winning king and pawn ending for White. Awesome play from both sides! The game of the SuFi for me!
The sequence of wins was completed in game 80 with a comfortable win for Stockfish on the White side of a Modern. Games 83 and 84 demonstrated again an area of defence that Stockfish inherits from Stockfish Classical but that Leela has not yet mastered particularly well: attritional defence. Both engines once again faced the Nxc6 approach in the Open Sicilian.
1g2.e4 c5 2.Nf3 Nc6 3.d4 cxd4 4.Nxd4 Qc7 5.Nc3 e6 6.Be3 a6 7.a3 Nf6 8.f4 d6 9.Qf3 Be7 10.0–0–0 0–0 11.Nxc6, see Fig. 15a. Stockfish took the safe approach and went for an inferior endgame it held for 161 moves. 11...bxc6 12.g4 d5 13.g5 Nxe4 14.Nxe4 dxe4 15.Qxe4 c5 16.Qe5 Qxe5 17.fxe5, see Fig. 15b. Leela by contrast kept the queens on, went for counterplay and lost without a fight.
Game 89 was another chance for Leela to shine as it seems to have refuted the (dodgy) Snake Benoni with powerful opening play. 1.d4 Nf6 2.c4 c5 3.d5 e6 4.Nc3 exd5 5.cxd5 Bd6 6.Nf3 Bc7 7.d6 Ba5 8.e4, see Fig. 15c, the last an aggressive move that has only been played once over the board and once in correspondence in my databases. 8...Nxe4 9.Qe2 f5 10.Bg5 Qb6 11.g4, see Fig. 15d. Leela’s novelty and it is essentially winning. White undermines the knight on e4 and will also open the g-file against the black king. 11...0–0.
Fig. 15.
Game 83 Lc-St (a) p11b, (b) p17b: game 89 Lc-St (c) p8b, (d) p11b, (e) p19b.

11...Qxb2 12.Qxb2 Bxc3+ 13.Qxc3 Nxc3 14.gxf5 b6 15.f6 (15.Nh4 followed by Rg1–g3 was Stockfish’s line and also looks very difficult for Black.) 15...gxf6 16.Bxf6 Rf8 17.Bxc3 Bb7 18.Kd2 Bxf3 19.Re1+ Kd8 20.Rg1 was Leela’s main line with a big advantage for White.
12.0–0–0 Bxc3 13.bxc3 Nxd6 14.Rg1 Ne4 15.Qc4+ d5 16.Rxd5 Kh8 17.gxf5 Nf6 18.Re5 Qd6 19.Bf4, see Fig. 15e. Stockfish now gives up the queen to stave off disaster but it is never enough.
19...Nc6 20.Re8 Nxe8 21.Bxd6 Nxd6 22.Qg4 Nxf5 23.Bd3 g6 24.Ng5 and Leela finished off the game with little difficulty. Strangely enough, neither Stockfish NNUE nor Stockfish Classical understood the power of 7.d6 and 8.e4! However, unluckily for Leela, Stockfish still assessed the position after quieter play as much better for White and Leela lost anyway as Black to once again leave the mini-match tied!
The match was obviously now decided but Stockfish still had time to add two extra wins to bring the difference to +9. Its win on the White side of a 4
1.e4 e6 2.d4 d5 3.Nc3 Bb4 4.e5 Qd7 5.Qg4 Bf8 6.Nf3 b6 7.Bb5 c6 8.Be2 Ba6 9.0–0 Ne7 10.Bxa6 Nxa6 11.Ne2 c5 12.Ng3 Nb4 13.c3 Nd3 14.Rd1 c4 15.b3 Nxc1 16.Rdxc1 cxb3 17.axb3 g6, see Fig. 16a. White stands pleasantly with a strong centre and a lead in development but it seems that Black is going to get castled within a couple of moves when there does not seem to be too much danger. Stockfish’s next sequence of moves are really clever, forcing Black to undevelop in order to develop while subtly improving its own position at the same time.
18.Qg5 stopping ...Bh6 and meeting 18...Bg7 with 19.Nh5! 18...Ng8. Black undevelops the knight in order to achieve ...Bh6. 18...Bg7 19.Nh5 0–0 20.Nf6+ Bxf6 21.exf6 wins. 19.Qf4 Bh6 20.Ng5, see Fig. 16b. The clever manoeuvre 19.Qf4 and 20.Ng5 stops Black from redeveloping the knight to e7 due to the threat against f7! Black is forced to move the bishop again in order to develop its knight.
20...Bg7 21.Ra6 f6. Leela takes risky measures to free itself from White’s pressure. It feels like too much and Stockfish obliges by demonstrating this with a fine positional piece sacrifice. 21...Nh6 was Black’s best but White is pleasantly in control after 22.Rca1 as the black knight would much rather be on e7 to be able to defend the queenside from c6.
Fig. 16.
Game 92 St-Lc (a) p18w, (b) p20b, (c) p26b.
22.N5e4 fxe5 23.dxe5 dxe4 24.Nxe4 Nh6 25.Nd6+ Ke7 26.Rca1, see Fig. 16c. White is not playing for mate but simply for complete control. The black king is in a terrible state: a move like 26...Rhf8 is met simply by 27.Qh4+ winning back a piece. At first sight, Leela does excellently to liquidate into an ending, which seemingly has a sting in the tail!
26...Rhd8 27.g3 g5 28.Qxg5+ Kf8 29.Rxa7 Nf7 30.Nxf7 Rxa7 31.Rxa7 Qxa7 32.Nxd8 Qd7 33.c4 h6, see Fig. 17a. It seems as if Leela has found a miracle way of saving the game since the knight on d8 is trapped. However, it is all an illusion!
34.Nxe6+ Qxe6 35.Qd8+ Kf7 36.f4, see Fig. 17b. +8.09 from Stockfish! Black’s bishop is helpless against the White pawns. White can even sacrifice the a- and b-pawns to free its king and then the remaining pawns are strong enough to win the game for White. Excellent judgement!
36...Qf5 37.Qxb6 Qc2 38.Qd6 Qe2 39.Qd7+ Kg6 40.Qe6+ Kh7 41.Qf5+ Kh8 42.c5 Qe3+ 43.Kg2 Qxc5 44.Qe6 Qb5 45.Kh3 Qf1+ 46.Kh4 Qg2 47.h3 Qf3 48.Qc8+ Kh7 49.Qf5+ Kh8 50.e6, see Fig. 17c. 50...Qxb3 51.e7 Qg8 52.Qg6 Qc8 53.e8Q+ Qxe8 54.Qxe8+ Kh7 1–0.
Fig. 17.
Game 92 St-Lc (a) p34w, (b) p36b, (c) p50b.
Once again, it was a very enjoyable SuperFinal. It seems that Stockfish and Leela are suddenly clearly ahead of everyone else but as more engines implement NNUE we may see some new names jostling for supremacy... cannot wait! Bring on Season 20!
References
1 | Sadler, M. & Regan, N. (2016). Chess for Life. Gambit. ECF Book of the Year, 2016. |
2 | Sadler, M. & Regan, N. ((2019) a). Game Changer: AlphaZero’s Groundbreaking Chess Strategies and the Promise of AI. New in Chess. See also https://www.youtube.com/watch?v=FW-hDMbZHAY and https://www.youtube.com/watch?v=FW-hDMbZHAY. |
3 | Sadler, M. & Regan, N. ((2019) b). Zeitenwende im Schach: AlphaZeros Bahnbrechende Strategien und die Verheissungen der KI. New in Chess. |
4 | Sadler, M. & Regan, N. (2020). Chess Giants video commentaries on TCEC. Youtube playlist https://www.youtube.com/watch?v=IT3uOzyfBek&list=PL6hd-GulcneW5nQkc38i4eZpjN_7VGccQ. |
5 | TCEC (2020). https://www.tcec-chess.com/archive.html. The TCEC archive site. |