19th World Computer-Bridge Championship
The World Computer-Bridge Championship (WCBC) is held annually at a major human championship. The 2015 event was held on August 10-15 at the American Contract Bridge League’s summer North American Bridge Championship (NABC) in Chicago.
Eight of the best robots competed, including defending champion SHARK BRIDGE1, many time winners JACK2 and WBRIDGE53, past champion BRIDGE BARON4, multiple runner-ups, MICRO BRIDGE5 and Q-PLUS BRIDGE6, ROBOBRIDGE7 and newcomer GOTO BRIDGE8. More information can be found on the Entry page of the 19th WCBC, located on the official website, computerbridge.com.
The format was a 32-board round robin with the top four robot teams (teams are composed of four identical robots) advancing to the semifinal 64-board KO stage.
Table 1
The round-robin results
| WBRIDGE5 | 104.47 |
| JACK | 96.30 |
| MICRO BRIDGE | 92.66 |
| Q-PLUS BRIDGE | 68.25 |
| SHARK BRIDGE | 67.95 |
| BRIDGE BARON | 58.23 |
| GOTO BRIDGE | 41.62 |
| ROBOBRIDGE | 30.52 |
In the semifinal matches JACK defeated MICRO BRIDGE, 194-122 and WBRIDGE5 defeated Q-PLUS BRIDGE 162-122. A close final saw JACK take the title for the 10th time, defeating 3-time champion WBRIDGE5, 165-148.
Some sets of deals played in the robot championship were played earlier in NABC events, namely, the 4th Round-Robin segment used 32 deals from the Grand National Teams (GNTs) Championship Flight semifinal match and the semifinal KOs used 32 boards from the Wagar Women’s Team KO (Wagar) final. The human results are archived on BridgeBase Online. An analysis of the comparative play between the humans and robots for these deals can be found in the Results page of the 19th WCBC.
The top robots demonstrate play that is often on a par with top human play, but due to technical and Conditions of Contest limitations as well as practical considerations (memory limitations and speed requirements), sometimes result in play algorithms that produce, in certain situations, clearly inferior play. For a more extensive look at how robots play see two recent articles (Levy, 2015a,b) as well as analysis on the Results page of the 19th WCBC section posted on the official website, www.computerbridge.com. On the official site you will also find the 19-year history of the event along with previously published articles on robot play.
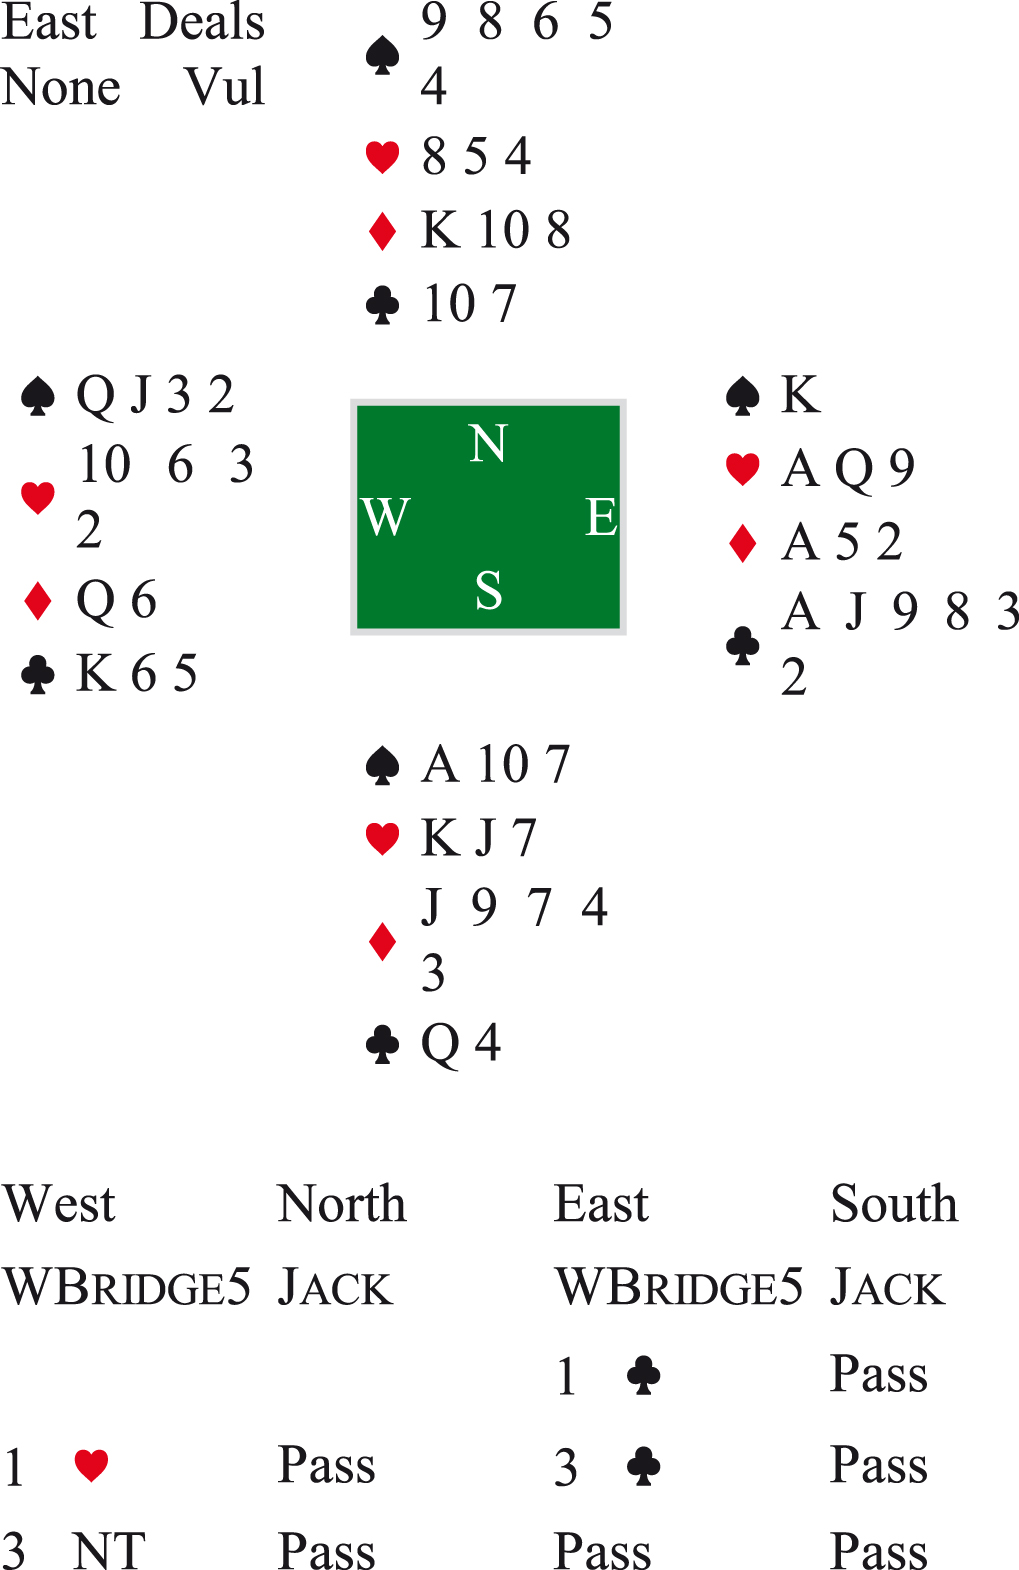
The following deal from the GNT event demonstrates an expert play at trick one. The contract was 3NT by South at all the four GNT (semifinal) tables and all eight robot (4th round-robin segment) tables, with a diamond lead (low) at three GNT tables and four robot tables.
Fig.1
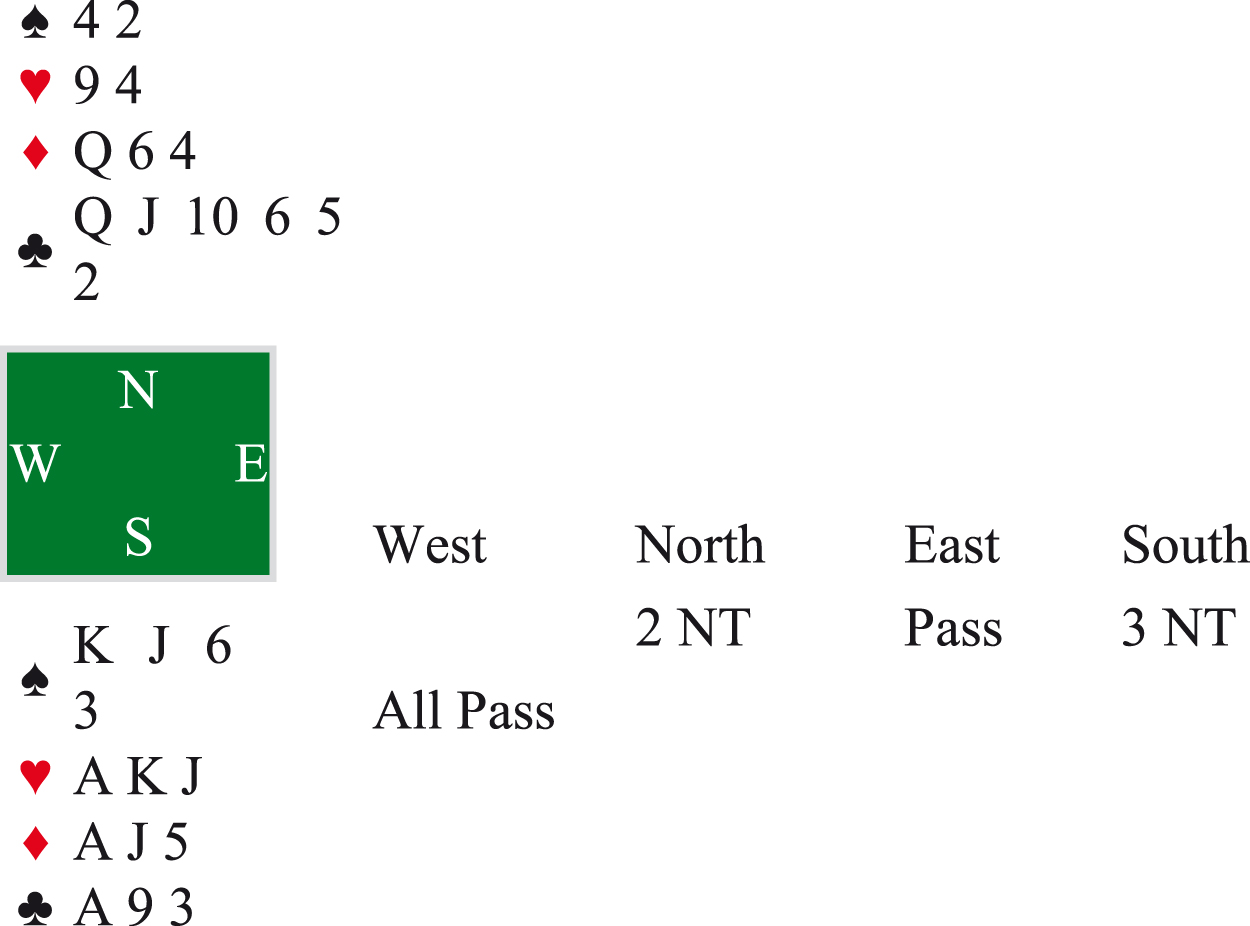
Opening lead  3
3
All the GNT expert declarers won the first trick with the A, rather than cheaply with the J. WBridge5 and Jack, employing a double-dummy and single-dummy technique, respectively, made the same play. All of these five declarers led the  3 at trick 2, the humans to induce a mistake, hoping a player with K x x will prematurely win the trick, and the robots because they assume they can pick off the king if East holds K x x and ducks the lead to the queen. If West holds the K, winning the first trick with the A allows the Q to be an entry to dummy’s long clubs no matter how clubs divide, and guarantees the making of 3 NT.
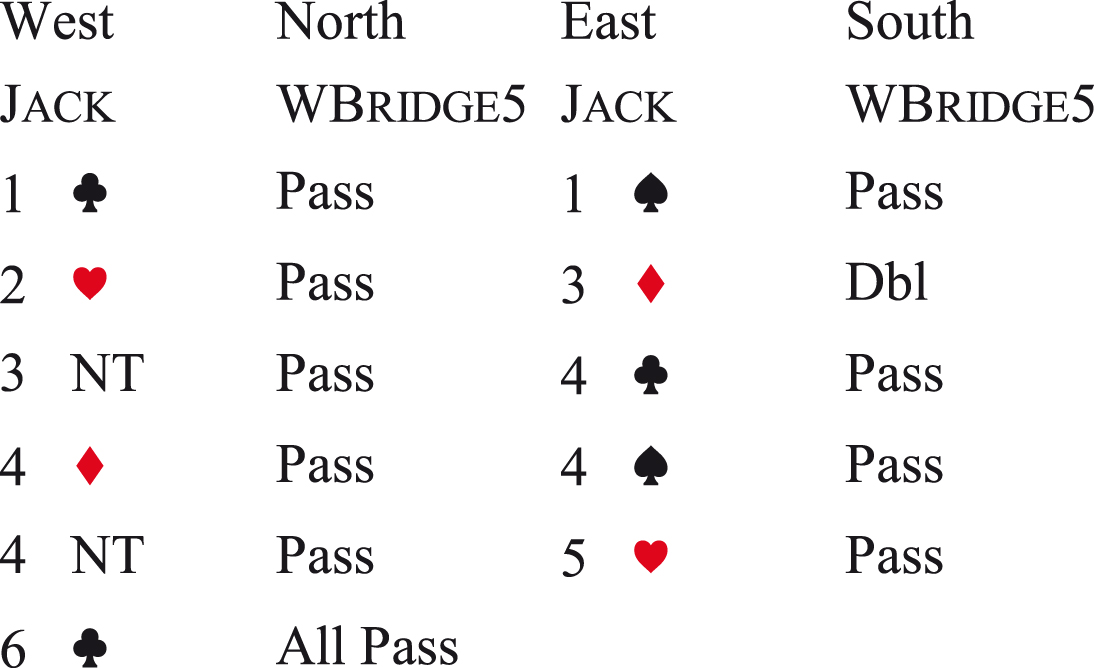
In the following deal, from the robot semifinal matches, also played in the Wagar final, the robots’ bidding styles and methods of evaluation led to all four robots reaching 6  while the two human teams rested in 4 . The bidding by Jack follows.
Fig.2
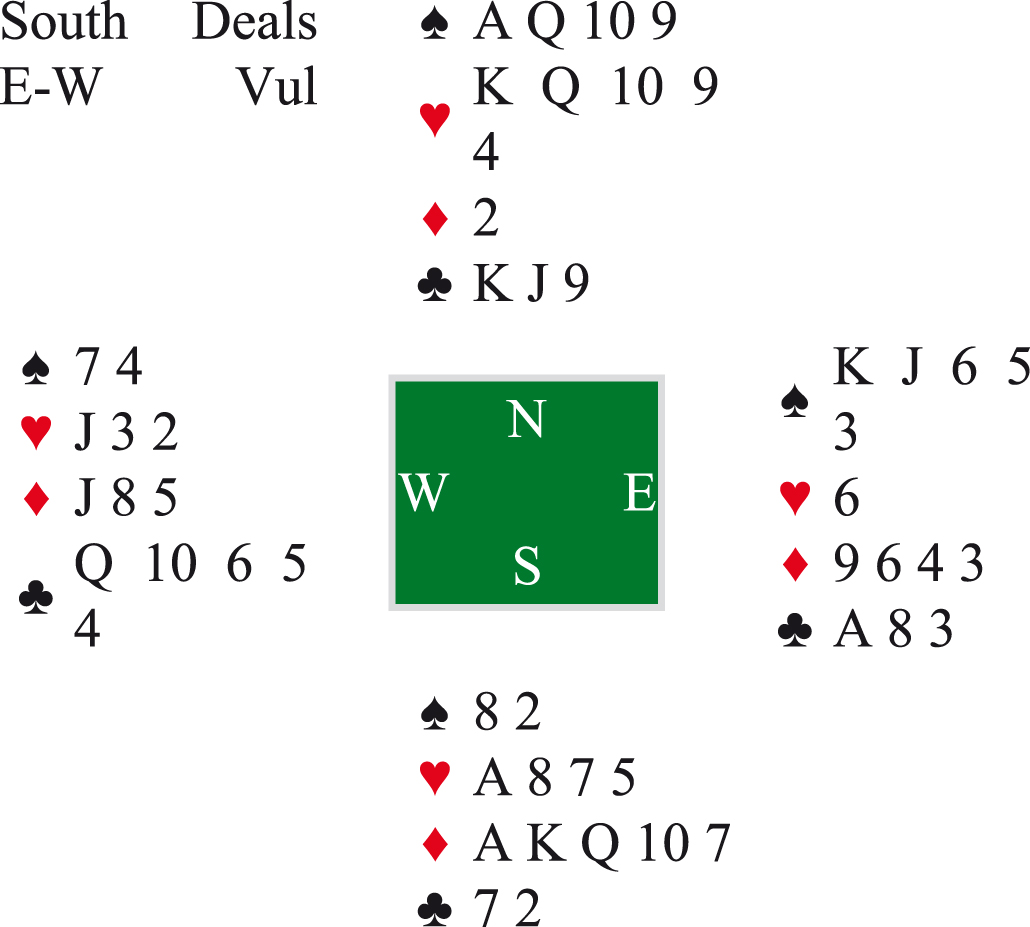
Fig.3
At all the robot tables, 6 make after the lead of the A. One advantage to bidding close slams is the possibility of a favorable lead. Even with a passive lead, the contract has reasonable chances.
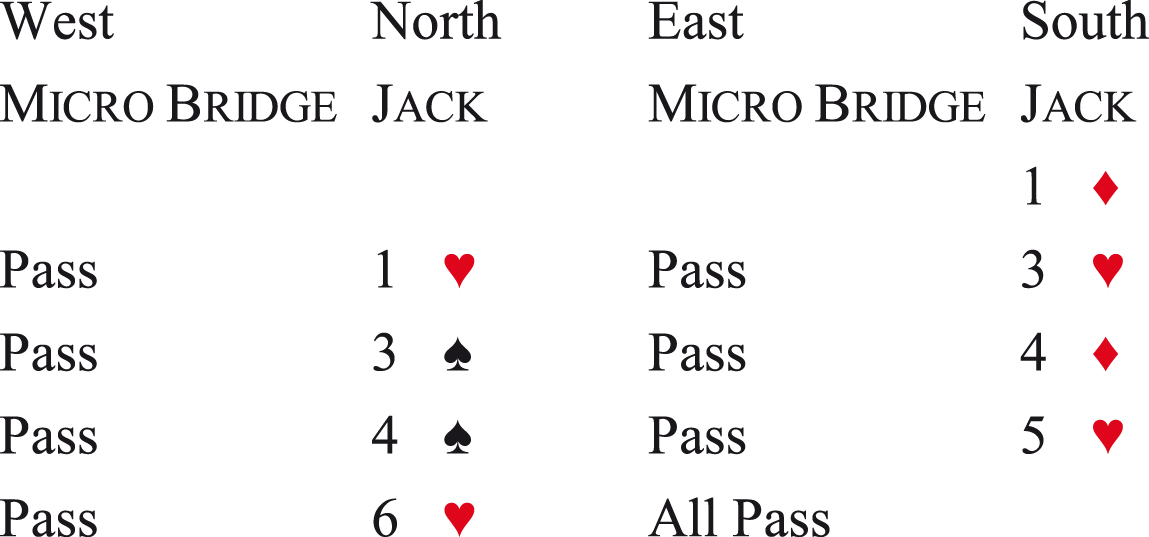
The next board from the same match shows the robots’ good bidding and a blunder due to programmed strict ‘rules.’
Fig.4
Opening lead A
All four robots in the semifinals reached 5 . At the table shown. Jack led the  4 at trick 2. Micro Bridge pulled trump, ducked a spade, ruffed the spade return, came to hand with a trump, ruffed the Q and discovered East with nine high card points ( A K Q). Micro Bridge assumes the 3C bid limited East’s hand to 11 high card points, which left no room for East to hold the K. After West discarded two hearts, Micro Bridge played for the drop of the king offside. Limiting the preempt bidder’s hand to 11 high card points makes the robot more effective on 98% of the times a preempt is made and suffers only sometimes in cases where both the hand contains more than 11 high card points and it is discovered.
The deal had an interesting result in the Wagar. Both Norths opened a 15– 17 1NT. With East-West silent, at one table South declared 5 when the club shortage was revealed, making six with the heart finesse on. At the other table the contract was 3NT by North. As with most expert defenders polled, East did not cash both the A K. East led the ace and then low so nine tricks were taken and the contract was made.
WBridge5 found an easy safety play against Jack in the final KO.
Fig.5
Opening lead 5
South won the A and returned the 10. WBridge5 won the queen and played a club to the Jack, guaranteeing the contract once North followed suit. Declarer can afford to lose one club as long as the club king remains an entry to the spade winner.
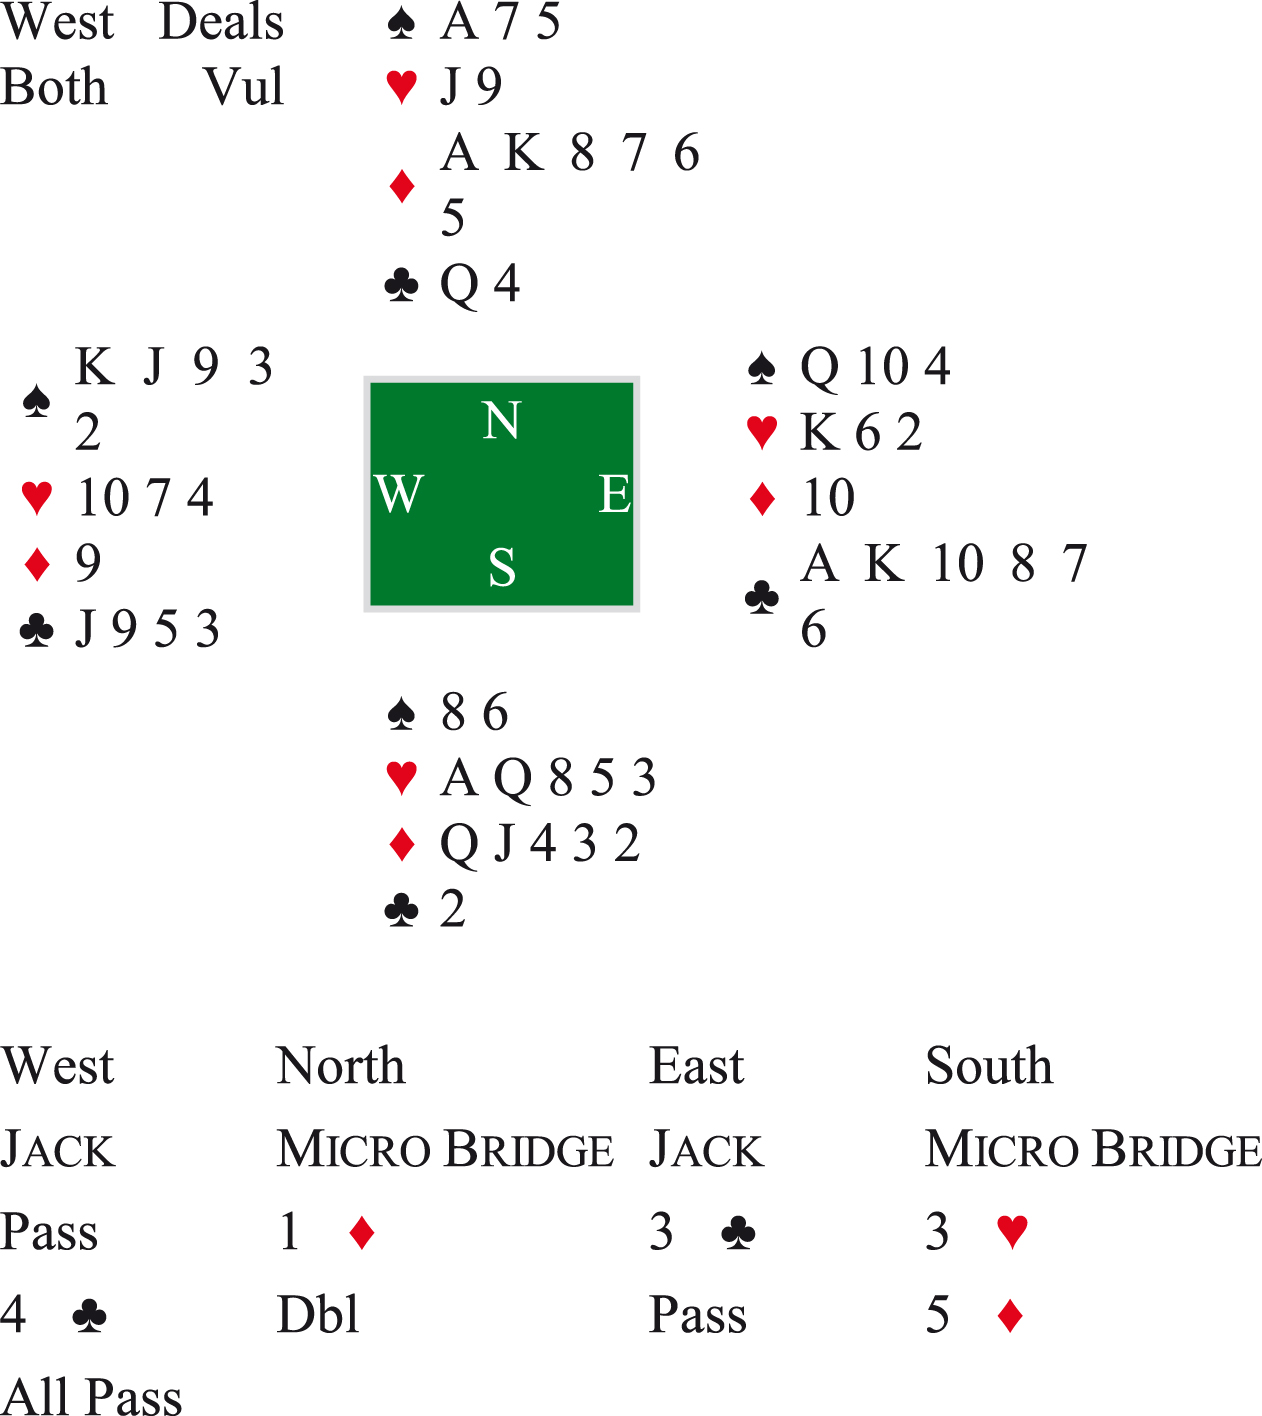
While the employed double dummy technique reveals the safety play, it failed on the following deal where a single dummy algorithm would likely have resulted in the winning play.
WBridge5 went down in 6 in the final match when it played a simple suit combination wrong.
Fig.6
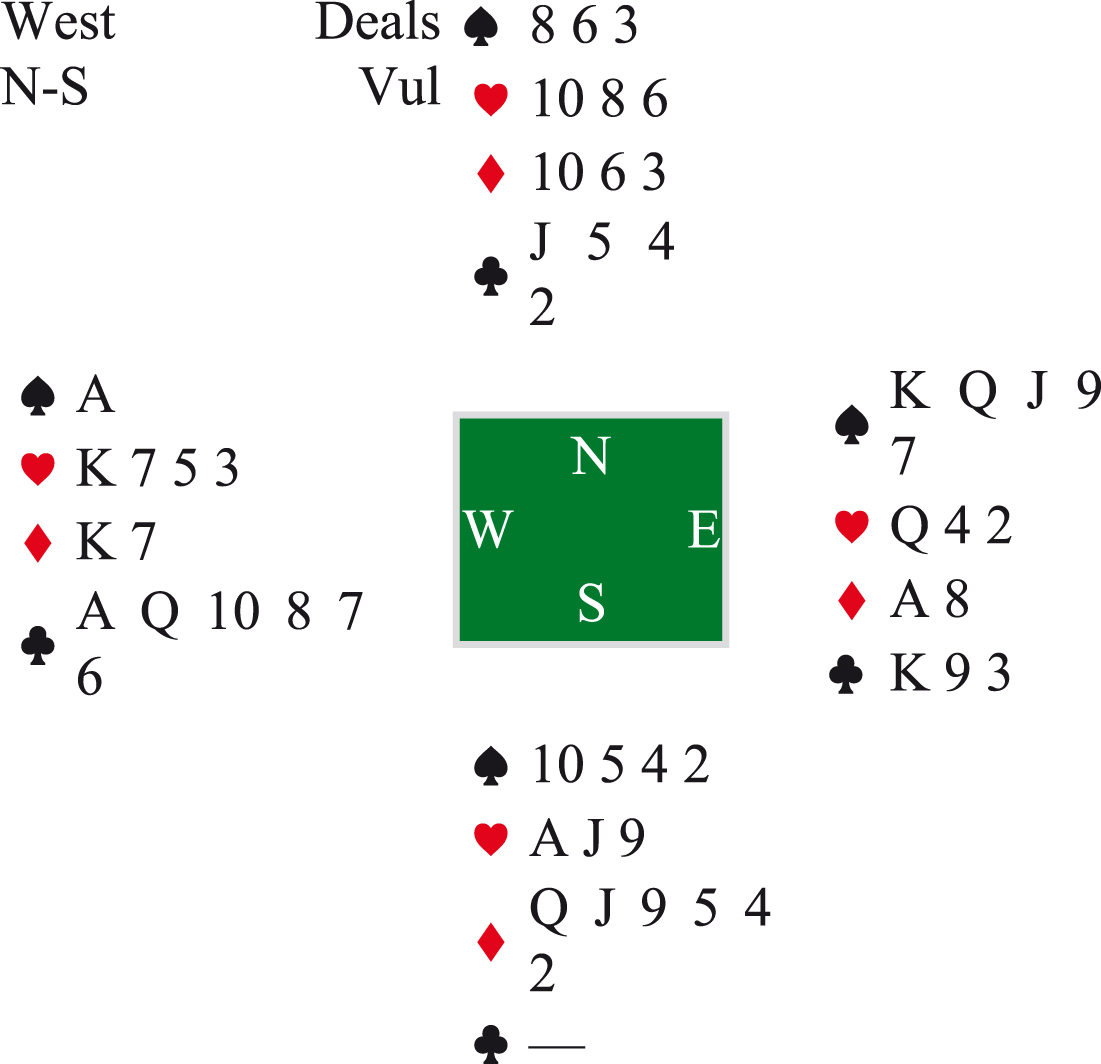
Fig.7
With the 3 lead won with declarer’s king, Jack correctly played the club queen, guaranteeing picking up the entire suit regardless of the distribution of the North-South cards. When South showed out, declarer took the marked finesse and took 13 tricks for+940. WBridge5, also in 6 with a low diamond lead, led a low club toward the K 9 3 and, of course, went up with the king, resulting in down one for -100, and a 14 imp loss for WBridge5.
The difference in the play of the two robots was due to the different algorithms used at trick one. WBridge5 uses a double dummy algorithm with a reasonable sample size at the start of play. In this analysis a high club or low club from hand ends with the same result as this analysis incorrectly assumes that all the opponents’ cards will be known (double-dummy) at the time a decision (card play by East) will be made, for example, finessing against the J x x x if North holds those cards, as in the actual deal. However, when it comes time to make the play of the 9 by dummy (East) a new double dummy analysis results in the play of the king, as the 9 is greatly inferior (gaining against J x x x in the North hand and losing to J (x) (x) in the South hand). WBridge5 uses a single dummy algorithm starting at trick three for a slam, one trick too late in this deal.
The complete play records of all matches can be found at the official website www.computerbridge.com along with the 19-year history and many articles on robot play.
Notes
1 Denmark, www.sharkbridge.dk/
2 The Netherlands, www.JACKBRIDGE.com/
3 France, www.WBRIDGE5.com/
4 USA, www.greatgameproducts.com/
5 Japan, www.osk.3web.ne.jp/ mcbridge/
6 Germany, www.q-plus.com
7 The Netherlands, www.ROBOBRIDGE.com/
8 France, www.gotobridge.com/en/
REFERENCES
[1] | Levy A. ((2015) a). Robots in Theory and Practice. The Bridge World, 86: (10), 26–27. |
[2] | Levy A. ((2015) b). Robots in Theory and Practice II. The Bridge World, 86: . |